Come fly with Mark in the lovely San Francisco East Bay!
Saturday, September 27, 2014
Jack Erbes' BB32 KFm3P Polyhedral Wing
Jack Erbes is one of the modern day geniuses of foamy construction. Here's his RCG build log of a KFM3 wing for the Blu Baby. My BB32 wings broke in half, so I'm especially interested in this. I'll lightly edit, but the first person voice is Jack's. I'll try this later and do my own writeup if I think it might be useful. Jack writes:
I recently made a KFm2 wing with polyhedral tips for use on my KFoenix Stick and flew it in RET configuration (Rubber, Elevator, & Throttle, no ailerons) and was really impressed with it. It had excellent tracking and control and good rudder authority, which had been a problem with the stock Slow Stick wings. The wing seem to "lean into" the turns nicely as speed increased and as turns were made more aggressively. It was almost as if I were flying a wing with ailerons.
Jack's Instructions are as follows:
The flat center section/polyhedral tip wings are a quick and easy build and have better inherent strength than the two panel wings with dihedral that have a center joint. And I've also found that the flat wings like this have much less need for a spar because the multiple and full width gluing lines create a monocoque structure with very good strength. As an example, the 48" span 11-1/2" chord wing I made for the KFoenix Sticks has two 1/4" dowels (36 grams for the two dowels, and only about $1.50 in cost) and probably has more inherent strength than it will ever need.
So I wanted to get a BB 33 back into a better advanced trainer and sports flyer configuration and decided to make a 33" KFm3 wing with polyhedral tips for it.
Materials:
1 24" x 48" sheet of FFF (Dow Protection Board III insulation, from Lowes or Home Depot)
1 3/16" x 36" wooden dowel (any wood will work)
Gorilla White Quick glue (any PU glue will work)
Clear package sealing tape (Duck brand "Standard" weight is good)
Colored package sealing tape for final covering/decoration/improved visibility in flight (final covering and colored tape is optional, but it contributes to strength and is very eye pleasing).
Clear Duck tape (fabric reinforced tape, any color would work but I would not be caught dead with a RC plane with the standard gray or silver tape on it)
Bamboo skewers for trailing edge reinforcement at wing center
Optional parts:
1/8" wood dowel or 2mm fibreglas rod for leading edge reinforcement
Use the standard BB 33 KFm3 wing templates and cut the two wing panels in one piece with no center joint. This can be cut with the skin side up or down, the skin side will be down as the wing is assembled.
Also cut the other two rectangular pieces of foam seen in the photo, their sizes are:
3-3/4" x 33" (KFm3 50% strip)
2-1/2" x 33" (KFm3 75% strip)
3/4" x 33" (filler strip)
The sizes of those and their purposes are explained below.
I have modified the 50% and 75% KFm2 strips a little to turn them into straight line cuts. Instead of the KFm3 steps running from 50% and 75% at the root chord to 50% and 75% at the tip chord, they run as a straight line all the way across the wing from the 50% and 75% points on the tips.
This makes the two KFm strips a wide rectangle in shape instead of having a wide or nearly flat "V" shape at their bottom edges.
The KFm3 Sport wing is 7-1/2" wide at the tips so the 50% and 75% lines are located 3-3/4" and 5-5/8" back from the leading edge. The two rectangular pieces of foam you cut above are used as follows:
3-3/4" x 33" (leading edge and back, back edge forms the 50% step)
2-1/2" x 33" (the front 5/8" supports the 50% step, the back edge forms the 75% KFm3 step)
The 3/4" x 33" filler strip will be under the KFm3 50% strip up near the leading edge. This filler supports the 50% strip against crushing and contributes to forming the upper wing surface into a nicely curved shape down to the leading edge. It will be glued to the wing panel and the KFm3 50% strip to form a full span line of structural strength across the wing.
All of the wing parts are seen in this photo, from the top down they are:
- KFm3 50% strip
- Filler strip
- 3/16" x 36" wooden dowel (Crafts section at Wal-Mart)
- KFm3 75% strip (also supports the 50% step)
- Wing panel for KFm3 Sport wing
The wing panel can be made without the templates from piece of foam that is 33" wide and 8" high. Simply mark two points 15-1/2" in from each end (that leaves a the 2" section in the wing center that is over the fuselage), then mark two points 7-1/2" back from the leading edge on the wing tips. Cut a straight lines from the marks on the wing tips to the marks near the wing center and that is the one piece wing panel.
The wing panel is skin side down, the KFm3 50% strip is skin side up, decide that arrangement now and turn the KFm3 50% strip over skin side down. Cut 45 degree or so bevels on what will be the leading edges of the wing panel and the KFm3 50% strip when the two are taped together.
The bevels allow the edges of the foam to bend and curl downward a little as the pieces are taped and folded to form the leading edge. The leading edge will be slightly rounded "V" and not sharp. A sharp leading edge is not wanted or needed on a slow flying plane like the BB 33 and a sharp leading edge is also be easily damaged.
To join the wing panel and KFm3 50% strip, lay a 36" or so long strip of the clear package sealing tap out with the sticky side up. I tape the right end down and the weight of the roll of tape keeps it straight and flat.
Lay the wing panel so it is on the bottom 3/4" of the tape and press it down and into good adhesion with the tape. That is what has been done already in this photo.
Note the faint lines drawn across the wing panel at this point. The two lower lines are drawn with a fine tip Sharpie across marks that were 3-3/4" and 5-5/8" back from the leading edge at the wing tips. They are the eventual locations of the 50% and 75% steps.
The line up near the leading edge is 3/4" back from the leading edge and is where the front edge of the filler strip will be when it is glued to the wing panel.
The 50% KFm3 strip has been laid on the upper half of the exposed tape with a even gap of a little less than 1/4" all the way across. I know from previous experience that the gap needs to be that wide for foam of this thickness and I used the 3/16" dowel that will be the main spar to judge the gap and keep it even all the way across. The spar is not glued there, it is just to keep the gap right and even.
A close up of the 3/16" dowel being used to judge the gap width and keep the gap even all the way across. I lay the dowel (that is a 1/8" dowel seen there) on the tape and just touching the wing panel leading edge bevel, then bring the KFm3 50% panel down and into contact with the tape so it is just barely or not quite touching the dowel. Then I remove the dowel and press the foam down into contact with the tape.
Cut the tape even with the foam on both ends and turn the joined panels over. Smooth the tape into contact with the skin side of the foam. The adhesion of the tape to the skin is very good, you are unlikely to be able to separate them without damaging the foam, removing the skin, or both.
I put one or two more strips of tape over the fold area to strengthen it more. If I use one piece I just center it on the first strip. If you use two strips I arrange one so it is 1/2" above the upper edge of the first piece of tape and the second so it is 1/2" below the lower edge. That will give you either two to three layers of tape on the leading and, for a very small amount of weight added, you will have a very durable leading edge and a stronger joint at the fold.
Then turn the wing panel back over and drop the 1/8" dowel into the gap between the wing panel and the KFm3 50% strip. The lift the 50% strip up to check the tension on the tape. If the gap was about right the foam will come up to just slightly beyond vertical when you start to feel some pulling tension on the tape. The weight of the utility knife leaning on the foam is holding the foam back as seen there If it all feels about right, lay a board that is about 33" long against the foam and fold it all the way back until it is laying flat on the top of the wing panel. It will resist folding back and some force will be needed but this is the step that finalizes and forms the leading edge.
I put weights on top of the board here so I could take this photo. Also, as you can see, the 75% strip was laying on top of the wing panel when I folded the 50% strip back so it is resting on that instead of the wing panel. But that is fine, it does not need to be any further down than that.
Allow the KFm3 50% strip to come back up and fold it to the front and out of the way for now. The next step will be to glue the filler strip to the top of the wing panel.
The line I drew on the wing panel to mark the back edge of the filler strip was spritzed with a fine spray plant sprayer. Spritz the area where the filler will be in contact all the way across, you can't get things too wet for PU and the glue will not work worth a darn if you do not use water.
Lay the filler strip bottom side up, put a small bead of PU glue down the length of it, and then spread it evenly across the filler strip with a flat flexible plastic spreader. I use spreaders cut from the plastic snap-on lids of food containers. When spread evenly there will a slightly shiny appearance across the width of the strip.
Position the strip even with the line, press it into contact with your fingers, and then weight it down all the way across the strip. Make sure to get weight all the way across and on the ends or the foaming action of the PU glue will lift the strip up. Check it several times in the first few minutes to make sure the strip does not slide out of contact. If you don't do that the "crooked gluing with PU fairies" will sneak in and push the stuff around to make you look bad.
Give it about 10-15 minutes (with Gorilla Quick PU) and you can remove the weights and get on with the job. Any foam outs or ooze here are not a concern. They are handy for telling when the glue is set. When you can push the foam outs down flat with your finger and none of it sticks to you it is set up enough.
The filler strip has been glued down in this photo and the KFm3 75% strip is laying bottom (bare foam) side up and will be glued down next. It will be aligned with the faintly seen line I drew earlier and that will form the 75% step.
The contact area where the 75% strip will contact the wing panel got spritzed with water, two beads of PU were run the length of the back of the 75% strip, that was spread evenly with the flexible plastic spreader, and the 75% strip was brought into alignment with the line and pressed down to contact the wing panel.
Plenty of weight was added to keep things in contact as the glue foamed up and I kept a watchful eye open to make sure the strip did not move around in the first few minutes.
I have some 2mm fibreglass rods that came out of kites that make for good leading edge reinforcements so I decided to drop one into the leading edge here instead of the 1/8" dowel. These rods will let you whack leaves off of trees and even trim the smaller new growth if you have enough speed. They are also handy for ringing trash barrels and administering punishment to dogs that are foolish enough to think that it is OK to catch airplanes.
Since I am going to bend the wing tips up for dihedral I cut the 2mm rods short enough (20" long in this case) to be only on the flat portion of the leading edge
The 3/16" dowel that is the main spar is also seen in this photo, it will be rolled back to the right and against the leading edge of the 75% strip when the wing is closed. The dowel and the 75% strip will both get some PU glue on them and foam will build up around them and create a second full span glue line to join the one formed by the filler strip.
OK, both the strips are glued down and we can get ready to close the wing up. PU glue sticks best to bare foam. So the plastic skin needs to be removed from the top of the filler strip if it is still there.
Fold the KFm2 50% strip back again (I use that board again to help with that) and, while it is held down flat against the top of the 75% strip, a line is drawn across the wing right at the 50% line. Then let it fold up out of the way again.
The line is faintly seen here, it marks the area where the 50% strip will rest on top of the 75% strip. Use the tip of the utility knife to make a very light cut along the line (just deep enough to cut through the skin) and peel the skin off of the area where the 50% strip will rest on the 75% strip. If you lift the skin up at a shallow angle as seen here it will come off in one piece, if you lift it too steeply the skin will tear when it encounters the pinholes in the skin and be a lot harder to remove.
The final closing! There is a lot going on here now. The back of the folded up KFm3 50% strip will make contact with the top of the filler strip and the 75% strip when it is folded down and the leading edges will join again. So the back of the 50% strip needs to be spritzed with water, it is easiest to do all of it and even the area where the tape is at the leading edge.
Also spritz the dowel with water and spritz the area in front of the 75% strip where the dowel will lay.
The dowel has been cut to 20" long, centered on the wing, and marks made to center the dowel in the wing again. This is the point where I usually put a disposable glove on one hand (otherwise it takes several days to "wear out" the PU on your fingers and let them look "not dirty" again.
Spread a bead of PU on the filler strip, run a small bead of PU on the tape and 2mm rod up leading edge where the tape is, run a thin line of PU on narrow strip that was peeled of skin at the front of the 75% strip, put a bead of PU down in front of the 75% strip where the dowel will be up against it.
Use the plastic spreader and spread the PU on the filler strip, spread the bead of PU on the narrow exposed strip at the front of the 75% strip.
Use a small brush (I use disposable acid brushes) to spread the glue around in the leading edge joint and in front of the 75% strip. Wet the dowel and lay it in the glue that is in front of the 75% strip, roll it over to get it covered with glue. Bring the dowel back against the 75% strip and you're done in here!
Weight it all down, look carefully under the edge of the board board and weights to make sure the three layers in in contact and add more weight or light clamping (the foam will crush easily) as needed. Give this a good hour or more to set up (with Quick PU) because it will want to spring open on it's own. For regular PU give it overnight or longer.
Look at tips of the parts on the corners to make sure you have full contact. The end of the filler strip is seen here, the dowel and 2mm rod are down in there where they can't be seen.
And there it is, a fully closed flat, KFm3 wing. You just wanted a good flat and sporty aileron wing, this would be a good stopping point on the wing build. Cut your ailerons out and finish it up that way. The wing is about 80 grams at this point, if I had left the 3/16" dowel and the 2mm fibreglass rod out it would be about 60 grams.
The next step is to the layout for the cutting lines for the polyhedral tips. I scaled down the 48" wing that flies the KFoenix Stick so well and decided to make the tips 5-1/2" long and to give the 1-3/4" (about 18 degrees) of dihedral.
I sanded the ends of the wings flat and vertical with the sanding shingle and measured in 5-1/2" from the wing tips. I drew a line from the leading edge to the trailing edge, making sure it was at a right angle to the leading edge. Then, on the KFm3 strips, I made two parallel lines 1/4" apart and centered on the first line.
I used a fine toothed jointer saw to cut down on the two outside lines (the 1/4" apart lines) at about a 9-10 degree angle. The two cuts were aimed to cut through the first two layers of foam and intersect on or just below the top surface of the bottom layer of foam.
I used a utility knife to cut a "V" groove from the 75% step back to the trailing edge. The depth of this groove was about 1/2 of the thickness of the single layer of foam.
With the center section weighted down, I lifted the tip to check for the target height of 1-7/8". That would allow 1/8" for fall or spring back after the glue sets and finish very close to the intended 1-3/4" tip height.
There was some minor binding in the "V" cut where the filler strip ends met and the support area of the 75% strip was and I cut some foam away in those areas until there was a light gap there. I want to allow room for the foaming action of the PU to get into the wing and between the sides of the joint and bond them all together.
It can't be seen under the wing but I used a cardboard cylinder to set the dihedral angle, rolling that in and out allowed for precise adjustment of the height.
A wrap of 2" wide clear duct tape will go around the joint, I drew two lines 2-1/8" apart and removed the skin from the areas where I wanted the PU glue foam and tape to bond with the wing. The tapes sticks to the plastic skin well so I did not remove the skin on the bottom of the wing.
Cut a piece of tape about 20" long and lay it sticky side up, lay the wing on the tape so the bend line is centered on it and so that the tape extends a little beyond the trailing edge. Let the tape hang down from the leading and trailing edges for now.
Spritz the peeled area and down inside the "V" cut well and brush the water around with an acid brush to get it all well wetted. Put beads up PU glue down in the "V" groove and along it sides, run a small bead down the shallow "V" groove from the steps back to the trailing edge, and put a small bead of glue on the skinn peeled area on each side. Don't get skimpy on the glue here, the excess will be inside the wing and doing wonderful things there.
Use the acid brush to spread the glue around in the "V" groove, down inside the wing and a little to each side, in the small "V" groove, and along the side where the tape will lay. Then take a paper towel and gently blot up any excess of surface water where the tape will contact the bare foam.
Bring the tape up over the leading edge and make a slit from each side of the tape of about 1/3rd of the tape width and parallel with the leading edge (this lets a wrinkle lay flat).
Spread the tape to full width and over the joint, blot up excesses of water, and work it down onto the faces of the steps. Use a propeller tip to push the tape into place. If a wrinkle forms on the tip side at the steps, cut a slit in the tape and let the wrinkle overlap itself.
Work all the way back to the trailing edge and then cut the tape that came from the front of the wing off even with the trailing edge (the other end is still hanging down). The foaming action is just starting to become evident in this photo, it has only been one minute or so. As the foaming increases and humps rise in the tape, smooth them to the sides and back down into the "V" grooves with a finger tip. The goal is to keep the tape flat on the top of the wing.
Continue to check the foam every minute or so and spread it eventy and push it back down into the grooves. The wrinkle that forms at the front over the leading edge is normal and unavoidable. It will be much less noticeable when the wing is finished. After 15-20 minutes you can quit smoothing things down and just leave the wing weighted down and the tip blocked up to the 1-7/8" height. I leave it overnight usually, but leave it for at least two hours or so.
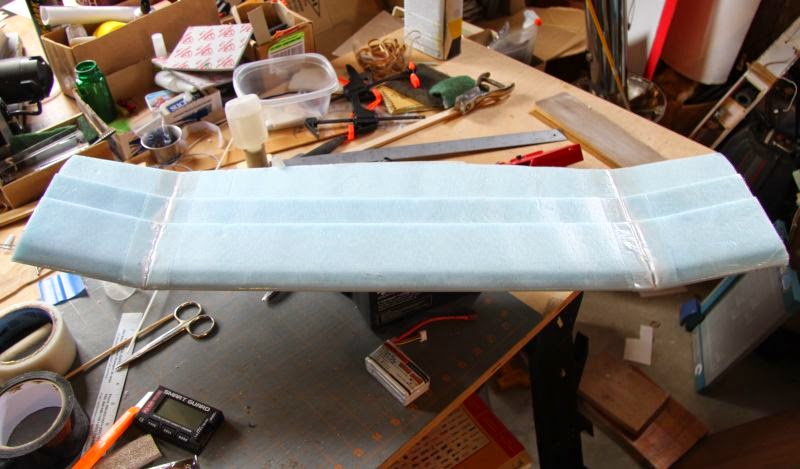
The wing after both tips are cut, folded up, and glued.
I cut a bamboo skewer to 6" long and soaked it in hot water for a few minutes. Then wrapped 60 grit sandpaper around a skewer and sanded a half round groove into the foam on the center of the trailing edge. That was spritzed, a bead of PU put in the groove, and the skewer laid down into it. I laid a piece of masking tape over the skewer and wrapped it down onto the wing panel to hold the skewer in the groove and let that set up. When the glue was almost set up (10-15 minutes) I removed the masking tape, sanded away the excess glue, and cleaned up the trailing edge.
The wing will also have clear plastic guards on the leading and trailing edges where the hold down rubber bands cross down, the skewer will protect the areas to the sides of the guard on the trailing edge.
This wing, with the 2mm rod in the leading edge and the skewer and other guards should have a very good service life. I still have not managed to destroy a single FFF KFm wing beyond it having any further use (they seem to outlive fuselages easily) and this one should be the same.
Here is my Old Yeller full monocoque fuselage BB 33 with the flat KFm3 Aileron wing on it. That is the fastest and sportiest BB 33 wing I have made to date. Laying in front of it is the new, butnot quite finished, KFm3P wing. They don't look like it, but those wings are both the same size.
Here is a little sneak preview of "Old Yeller" trying on his new wing (only lacking tip plates at this point). That is the plane will get a chance to test the polyhedral wing here in the near future.
 I recently made a KFm2 wing with polyhedral tips for use on my KFoenix Stick and flew it in RET configuration (Rubber, Elevator, & Throttle, no ailerons) and was really impressed with it. It had excellent tracking and control and good rudder authority, which had been a problem with the stock Slow Stick wings. The wing seem to "lean into" the turns nicely as speed increased and as turns were made more aggressively. It was almost as if I were flying a wing with ailerons.
 The wing panel can be made without the templates from piece of foam that is 33" wide and 8" high. Simply mark two points 15-1/2" in from each end (that leaves a the 2" section in the wing center that is over the fuselage), then mark two points 7-1/2" back from the leading edge on the wing tips. Cut a straight lines from the marks on the wing tips to the marks near the wing center and that is the one piece wing panel.


No comments:
Post a Comment