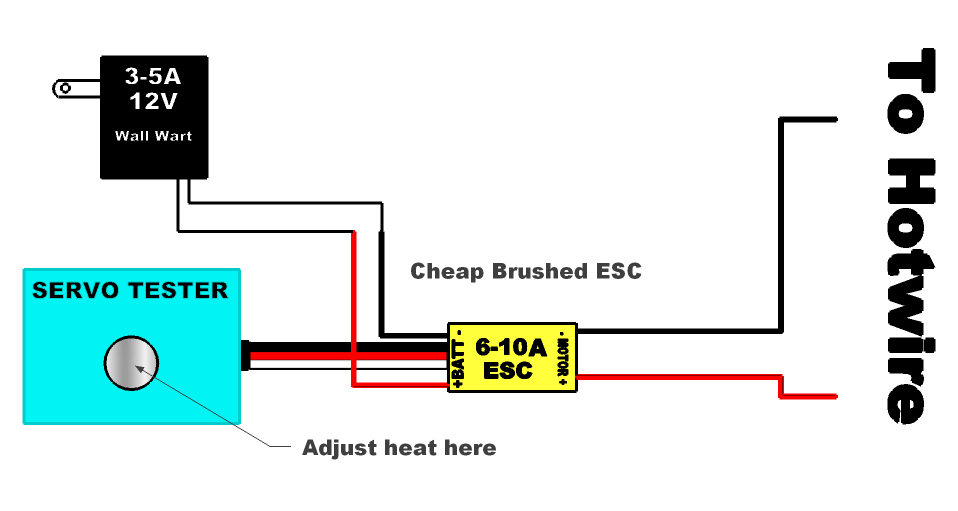
 From user 7up on rcgroups. Power from a 3-5A 12V wall wart, managed by a 6-10A brushed ESC, controlled by a servo tester. Attach the hotwire to the motor wires.
Sunday, September 26, 2010
Simply Brilliant Hot Wire Cutter Power Supply
From user 7up on rcgroups. Power from a 3-5A 12V wall wart, managed by a 6-10A brushed ESC, controlled by a servo tester. Attach the hotwire to the motor wires.Saturday, September 25, 2010
BSD Micro - Small Plane Resources
BSD Micro RC: "BSD started in 1996 with our first product, a 2 gram ESC, followed by chargers for small NiCd cells. Today BSD is the Micro RC Specialist with a full line of micro equipment, kits, and planes in the under two-ounce category. We sell state-of-the-art equipment from firms like JMP Solutions, Falcon Models, Didel, Kokam batteries, EFlight Designs and others. We also manufacture our own BSD products like our BSD magnetic actuators, prop adapters, gearboxes, foam wings, and chargers."
A nice explanation of PPM radio signals
http://www.mftech.de/ppm_en.htm

Interestingly, the radio transmitter and receiverr does no transformation of the signal between the encoder and the servo.

Interestingly, the radio transmitter and receiverr does no transformation of the signal between the encoder and the servo.
Wednesday, September 22, 2010
Vendor: RCTimer Online RC Store
RCTimer.com:
"RCTimer Power Model Co.,Ltd, was established in 2003 in ShenZhen city, Guangdong Province, China as a professional manufacturer for R/C accessories of model toy's applications. As a master in hobby industry, we always do our best to improve our designs concepts & manufacturing technologies. We offer a wealth of manufacturing experience & technology with the expertise acquired over the past 5 years. We are constantly enhancing our R/C EQUIPMENT and ourselves according to the professional suggestions offered by our respect customers, in order to bring superior and innovative products to the customers from all over the world."
"RCTimer Power Model Co.,Ltd, was established in 2003 in ShenZhen city, Guangdong Province, China as a professional manufacturer for R/C accessories of model toy's applications. As a master in hobby industry, we always do our best to improve our designs concepts & manufacturing technologies. We offer a wealth of manufacturing experience & technology with the expertise acquired over the past 5 years. We are constantly enhancing our R/C EQUIPMENT and ourselves according to the professional suggestions offered by our respect customers, in order to bring superior and innovative products to the customers from all over the world."
Notes on cutting BluBaby 33
Some build notes on cutting BluCore:
- really sharp blade. box cutter is fine, the thick blade makes it easy to make straight cuts. there aren't enough tight curves where you will need a thinner blade.
- make two bodies at the same time if you have the foam, if you want the practice
- when laying out, flip the wing and body templates so you will have left/right sides with the good side facing out
- lay out the wings so that any foam "ripples" run longitudinally (left/right) across the wing.
- some pieces have an "inside" and "outside" (body, bulkheads). cut these from the parts of the foam with lots of ugly printing, so that the printing is hidden on the inside.
- some pieces are exposed on two sides (wings, elevator, rudder, stabilizer). Cut these from areas of the foam that look nice on both sides.
Tuesday, September 21, 2010
Concord Model Engineers
CME: "Weekly (Sunday) Fun Flying at the end of Court Lane, Concord (Electric only)
Our Club Meetings are held currently at 7:30PM on the second Tuesday of the month at the Buchanan Airport Terminal Bldg.
(Near the Control Tower)"
Our Club Meetings are held currently at 7:30PM on the second Tuesday of the month at the Buchanan Airport Terminal Bldg.
(Near the Control Tower)"
Monday, September 20, 2010
Pager Motors
Here's some links about 4mm and 8mm pager motors.
- recommending a GWS 2508 prop, with some data.
- different models at pagermotors.
- google for "namiki pager motors"
- lots on ebay, seems about $15 including shipping for 10 units.
Friday, September 17, 2010
Things I'd like to try: The Simple Delta
 A simple easy to build Delta that makes a lot less noise than the more common pusher or prop in a slot Delta design.
- WS is 20"
- LE is 7" long
- LE to TE (hinge line) is 14.25"
- Elevons are 2" wide
Things I'd like to try: The OmniWing

Bluetooth GPS Logger

"a high-tech product combines the advanced Bluetooth technology and GPS technology. Through, Bluetooth technology, you can receive and storage GPS data through intelligent mobile phone, PDA, laptop and desktop. Can be used for location,navigation,read the history of track records, and other applications."
Plantraco: Really Small Planes!
Plantraco Microflight
This is the place to go for tiny planes. Check out the soldering video... "10-20x binocular magnifiers recommended."
This is the place to go for tiny planes. Check out the soldering video... "10-20x binocular magnifiers recommended."
Wednesday, September 8, 2010
Making a Carbon Fiber Push Rod
What you need:
Make the push rods:
measure length required
- carbon fiber rod, 2mm, cut to length
- 2 pieces music wire, .032i inch (.81mm), 2 inches each
- screw thing: 1.5mm
- 5 minute epoxy
Make the push rods:
- measure length required
- cut CF rod, length = measured length - 1 inch (wire will make up remaining length) using dremel cutoff wheel.
- cut 2 pieces of wire, 2 inches each
- put a tiny irregularity (bend) in one end of each wire. this will go into the CF tube, and provides something for the epoxy to hold against.
- clean wire
- mix 5-minute epoxy
- epoxy wire into CF rod, 1 inch. don't forget to put the tiny bend into the hole.
- after the epoxy has dried, tug on the two wires to make sure they don't slide out of the hole. If they do, you didn't do a good job on the epoxy.
measure length required
- Z-Bend one wire.
- attach z-bend to servo. (then you don't have to drill out hole in servo arm).
- drill horn to fit 1.5mm screw thing
- attach screw thing to horn
- put straight wire into screw thing. you can get clearance by pushing servo arm away from the control surface, and pushing the control surface away from the servo arm. this will give you just enough clearance for the wire to go into the screw thing hole. if there's not enough clearance, your wire is too long and you should trim it down to the proper length where it just fits in.
- turn on servos so they are centered
- align control surface to neutral position
- screw down screw things
Saturday, September 4, 2010
Giant Cod guides
Here's the battery guide. There's some others that look like they might be interesting.
Connector Mania: All Kinds of Connectors

including trainer cords.
"No matter how you call it - BEC, JST, or P connector, YES, we have these little RED connectors! This connector is also used in many park flyers power pack. For male order 2830, for female order 2832, for 6" Ext. order 2836, for switch order 2770, for Rx Batt. Box order 2911."
Connector Mania: Deans to XT converters

If you've read any of my earlier posts, you can see that I'm in equal measure obsessed with and confused by connectors. I think I've finally got it all figured out. Later I will post my Grand Unified Theory of Connectors.
Wednesday, September 1, 2010
HowTo: Using a Watt Meter

The instructions in the package are pretty inscrutable, so here's a quick HOWTO.
Basic Idea
- This thing sits between your battery and your ESC.
- It measures voltage, amperage, and wattage.
- It has a HOLD mode that keeps the highest values.
- When it's set up, you fiddle with your props, motors, etc, and see the power requirements of various setups.
- You can send it aloft to record the flight's peak power requirements.
- The unit doesn't come with any power connectors, so you need to attach your own.
- The wires labeled IN attach to the battery. Put a male power connector here.
- The wires labeled OUT attach to the ESC. Put a female power connector here.
- Black wire = Neutral (-)
- Blue wire = Hot (+)
- Plug the unit into a battery. Whatever battery you use to fly a plane is fine (the manual says the voltage rage is 8-30V, but it seems to work fine with 2S batteries as well, as seen below).
- The display of the unit will turn on.
- If you use a 2S battery, you will see something like this:
- Voltage (U=7.93V). Over time this will go down, as your battery discharges.
- Amperage (I=0.1A)
- Wattage (P=1.0W)
- Attach a motor to your ESC.
- Plug your ESC into a receiver. It's OK if there are servos attached.
- Attach the OUT wires to your ESC.
- Your setup should power up and work as normal.
- The power levels should go up a bit, since you're running servos and a receiver.
- Wiggle your servos. You will see the numbers jiggle in response.
- Make sure your motor is secure, and bring the speed up.
- You will see the amperage (I=) and wattage (P=) increase.
- Bring the speed back down.
- You will see the values decrease back to the original values.
- The voltage may have gone down a bit, since you've been using some power to run these tests.
- HOLD mode will measure the Peak values.
- To turn it on, click the HOLD button.
- Rev your motor and bring it back down a couple of times.
- You will see these peak values displayed. Rearranging the order a bit, they are:
- P 14.3W -- maximum power (wattage). This is the peak power output of the battery.
- Up 7.71V -- voltage when P was at max.
- Ip 1.9A -- amperage when P was at max.
- Im 1.9A -- maximum amperage, even if it didn't correspond to P above.
- Um 7.84V -- the minimum voltage of the time period.
- Click HOLD again to go back to instantaneous mode.
- If your plane is big enough to carry a couple of extra ounces, you can attach the meter between the battery and ESC in your plane, set HOLD mode, and find out your peak usage aloft.
- If you have a good quality multimeter, you can adjust your unit's readings.
- Depress HOLD for three seconds and you will be in adjustment mode.
- Measure an unloaded power source with both the watt meter and your reference multimeter.
- Use the ADD and SUB menu items to make the two units agree.
- SAVE will of course save your calibration.
Subscribe to:
Posts (Atom)