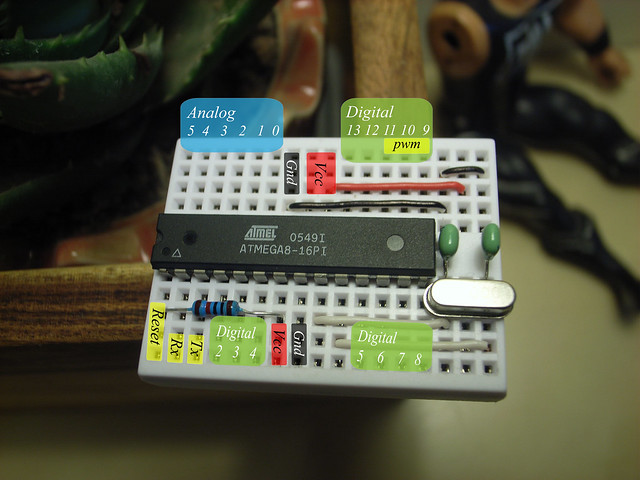
Standalone Arduino mini pin mapping:
Nice and cheap Arduino.
Friday, December 17, 2010
Bare Bones Board Kit | Modern Device
Bare Bones Board Kit | Modern Device: "The Bare Bones Board (BBB) is an Arduino-compatible board (Freeduino) that implements the functionality of the Arduino Duemilanove/Diecimila, on a smaller printed circuit board, by removing the USB communications chip to another board."
Tuesday, December 14, 2010
RC Groups - View Single Post - Max Ceiling?
RC Groups - View Single Post - Max Ceiling?:
Calculated probability of hitting an aircraft if you fly in
the landing zone of an airport.
"1 in 42 million"
Calculated probability of hitting an aircraft if you fly in
the landing zone of an airport.
"1 in 42 million"
Monday, December 13, 2010
Vendor: ImmersionRC
Trappy's FPV system:
Products - ImmersionRC: "EzUHF: UHF Radio Control system, designed for FPV and UAV flight.
- Reliable FHSS control system
- Integration with ImmersionRC's EzOSD, for on-screen feedback of uplink status
- Built-in headtracker port, for direct connection with most headtrackers
- Bidirectional-ready"
Products - ImmersionRC: "EzUHF: UHF Radio Control system, designed for FPV and UAV flight.
- Reliable FHSS control system
- Integration with ImmersionRC's EzOSD, for on-screen feedback of uplink status
- Built-in headtracker port, for direct connection with most headtrackers
- Bidirectional-ready"
Sunday, December 12, 2010
BEV-FY-20A II Flight Stabilization System
Lots of details on flight stabilization here.
"BEV-FY-20A measures the present flying attitude through the inertial platform which consists of three axis gyroscope and tri-axial accelerometer. when is under the balance controlling , BEV-FY-20A will control the pitch attitude through elevating rudder , the roll attitude through ailerons and stably the course through the rudder .when the flight attitude out of the level ,the balance apparatus will give relevant of auto control gains to help the plane back to horizontal flight . when is in the 3D mode , the balance apparatus induce the rolling speed of three axis through gyroscope ,to show the auto control gain through relevant control rudder and prevent the rolling of each axis .So the plane will maintain the current attitude."
Thursday, December 9, 2010
Airspace Notes
Pandemonia has lots of other interesting and useful information about "real" flying, especially in the Bay Area.
Class A airspace is tightly-controlled, instrument flying only, and above 18,000 feet. This tends to be where the jets are while cruising....
Class B airspace surrounds the biggest airports (like SFO). Class B airspace is tightly controlled, and usually very busy. Student pilots can't fly in Class B airspace without their instructor's explicit written endorsement [which I now have... HR].
Class C airspace surrounds busy airports like Oakland or San Jose. It's not quite as tightly controlled as Class B, but still has radar, full ATC services, etc. They let people like me fly in Class C.
Class D airspace surrounds smaller airports (like PAO or LVK) with a control tower, but not (usually) radar. Often very busy. Often scarier than class B or C because of the lack of radar....
Class E airspace is all controlled airspace that isn't one of the above. Most of the US airspace below 18,000 feet and not one of class A, B, C, or D is class E.
Class G airspace is uncontrolled airspace, typically just the lowest altitudes away from airports. There's not a lot of it in the Bay Area...."
Class B airspace generally looks like an upside-down wedding cake.
Class A airspace is tightly-controlled, instrument flying only, and above 18,000 feet. This tends to be where the jets are while cruising....
Class B airspace surrounds the biggest airports (like SFO). Class B airspace is tightly controlled, and usually very busy. Student pilots can't fly in Class B airspace without their instructor's explicit written endorsement [which I now have... HR].
Class C airspace surrounds busy airports like Oakland or San Jose. It's not quite as tightly controlled as Class B, but still has radar, full ATC services, etc. They let people like me fly in Class C.
Class D airspace surrounds smaller airports (like PAO or LVK) with a control tower, but not (usually) radar. Often very busy. Often scarier than class B or C because of the lack of radar....
Class E airspace is all controlled airspace that isn't one of the above. Most of the US airspace below 18,000 feet and not one of class A, B, C, or D is class E.
Class G airspace is uncontrolled airspace, typically just the lowest altitudes away from airports. There's not a lot of it in the Bay Area...."
Class B airspace generally looks like an upside-down wedding cake.
Wednesday, December 8, 2010
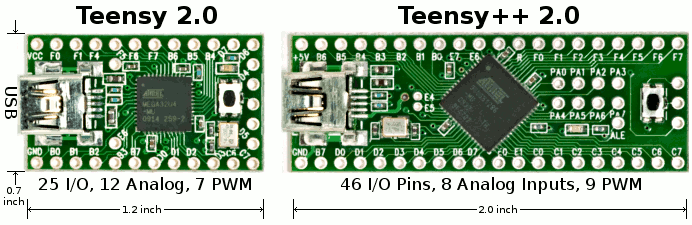
Teensy USB Development Board
Teensy:
It has it's own software environment, but can also run Arduino sketches using TeensyDuino:
"a complete USB-based microcontoller development system, in a very small footprint, capable of implementing many types of projects."
It has it's own software environment, but can also run Arduino sketches using TeensyDuino:
Many type of sketches are able to run on the Teensy! The digitial I/O pins work with digitialWrite(pin,value), digitalRead(pin), and pinMode(pin,mode). The PWM pins can be used with analogWrite(pin,value). Eight (8) pins can be used as interrupts with attachInterrupt(). The Teensy++ has 8 analog inputs that can be used with analogRead().
BaronPilot Arduino based copilot autostabilizer with Nintendo Wii component (tricopter, quadcopter)
BaronPilot Arduino based copilot autostabilizer with Nintendo Wii component (tricopter, quadcopter): "This is a program to stabilize a multicopter (copilot), runs on microcontroller like Arduino or Teensy and only a wii motion plus, no other electronics needed. These project started April, 2010. Supported are planes, tricopter, quadricopter ( and x config), hexacopter (penta and coaxial). The self-leveling capability helps when doing FPV (first person view)."
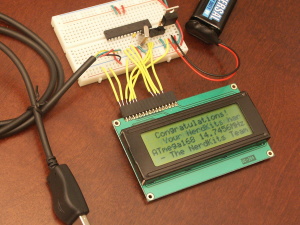
NerdKits -- another approach to embedded electronics.
Resistor Lead Forming Tool
Lead Bender
"Okay, you can bend your resistor leads by hand. We know. We all do it. But, resistor benders are fabulous for getting the leads bent squarely enough to go easily through the holes in your PCB or perf board. Silly? No, because it helps keep your board looking neat, and keeps the resistors from sticking too far above the board. If you are populating a circuit board with a lot of resistors, this tool can actually save you a lot of time. How? By making sure that your resistors are bent to exactly the correct length, so that they go through the hole on the first try, without any fuss. This is one of those tools that we never thought we needed until we got one."
more arduino resources.
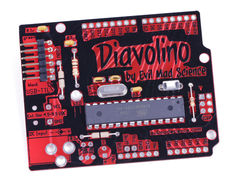
Evil Mad Science has the Diavolino, a low-cost Aduino-compatible board.
It's a low-profile through-hole version, with a simplified design. It's based on a ATmega328P microcontroller, and comes pre-flashed with the Arduino bootloader. Open source design, with bare basics hardware.
Diavolino is sold as an easy to assemble "through hole" soldering kit. Basic electronic soldering skill is required, and you provide the soldering tools: a soldering iron and solder, plus small wire clippers. Assembly time is typically 10-30 minutes, depending on configuration and soldering skill.
Tuesday, December 7, 2010
Brushless Motor Timing
The Future is Electric:
Good explanation of motor timing.
"For a long time now, the correct timing to use for brushless outrunner motors has been a problem because of all of the conflicting information available in both the print media (magazines & instruction sheets packed with ESCs) and the Internet."
Good explanation of motor timing.
"For a long time now, the correct timing to use for brushless outrunner motors has been a problem because of all of the conflicting information available in both the print media (magazines & instruction sheets packed with ESCs) and the Internet."
Monday, December 6, 2010
Shop 3M: 3M Blenderm Tape 1525-1
Shop 3M: 3M Blenderm Tape 1525-1:
Direct from 3M:
"Box(s)/12 Rolls
Price: $15.75"
Sweet, as opposed to $5/roll retail!
Direct from 3M:
"Box(s)/12 Rolls
Price: $15.75"
Sweet, as opposed to $5/roll retail!
Saturday, December 4, 2010
San Francisco Bay Area - Soarheads
San Francisco Bay Area - Soarheads:
"'Soarheads' is an informal group of enthusiasts who enjoy flying radio controlled sailplanes in the San Francisco East Bay area. Soarheads fly regularly on Tuesdays at the Berkeley Marina."
Wednesday, December 1, 2010
Downloads
Downloads:
T6 Transmitter USB Drivers: T6 Transmitter Mods
Downloads:
Thunder AC6 Battery Monitor Software, and Drivers:
(This software will work on other simular type chargers)
If you are having trouble with T6 config freezing using Windows XP, Vista, or Windows 7. Try this driver.
This USB driver works on some systems.
If you lose your default transmitter settings.
T6 recalibrate is a program that recalibrates your T6 transmitter.
Digital Radio is software that programs and recalibrates the T6.
Servo Protocol Notes
- pulse is 1ms (full left) to 2 ms (full right). 1.5ms pulse is centered.
- pulse rate is typically 50 hz (ie, 50 pulses/sec)
- overpulsing can heat up analog servos
- QUESTION: it seems digital servos don't have to be refreshed. Do analog servos always have to be refreshed? I tried sending a single pulse, and an HX-900 analog servo seemed to hold its position. Perhaps I was doing something wrong?
http://www.rcheliwiki.com/Servo_protocol
Sunday, November 28, 2010
600TVL High Resolution 1/3 SONY Color CCD Chipset PCB Board Camera
600TVL High Resolution 1/3 SONY Color CCD Chipset PCB Board Camera:
"# Q: Has this camera day/night switch?
# A: The camera is IR sensitive, it can auto switch day/night"
edit: I've got one of these now, details at:
http://eastbay-rc.blogspot.com/2012/02/sony-600tvl-super-had-board-camera-for.html
"# Q: Has this camera day/night switch?
# A: The camera is IR sensitive, it can auto switch day/night"
edit: I've got one of these now, details at:
http://eastbay-rc.blogspot.com/2012/02/sony-600tvl-super-had-board-camera-for.html
Friday, November 26, 2010
Indoor fun with a tiny ArduCopter quadcopter - DIY Drones
Indoor fun with a tiny ArduCopter quadcopter - DIY Drones: "Do you have an Ardupilot Mega and shield and want some fun for little money? check this tiny quad... my last drone in family..."
Saturday, November 20, 2010
Monday, November 15, 2010
Woodland Aero Modelers
Woodland Aero Modelers: "Woodland Aero Modelers is a special interest group pertaining to the hobby of Model Airplane building and flying. We are an AMA Chartered club, which has been in existence since 1936."
Lessons In Electric Circuits
Lessons In Electric Circuits: "A free series of textbooks on the subjects of electricity and electronics
Copyright (C) 2000-2010, Tony R. Kuphaldt
These books and all related files are published under the terms and conditions of the Design Science License. These terms and conditions allow for free copying, distribution, and/or modification of this document by the general public."
Copyright (C) 2000-2010, Tony R. Kuphaldt
These books and all related files are published under the terms and conditions of the Design Science License. These terms and conditions allow for free copying, distribution, and/or modification of this document by the general public."
Friday, November 12, 2010
EagleWing--strong EPO built [BEV-EagleWing EPO]- US$75.00 - BIRD'S EYE VIEW
EagleWing--strong EPO built [BEV-EagleWing EPO]:
"Another FPV plane from skywalker-model, eaglewing is ready now."
Wednesday, November 10, 2010
Gyros 101: Make your model fly better | Model Airplane News | Find Articles at BNET
Gyros 101: Make your model fly better | Model Airplane News | Find Articles at BNET: "What is a gyro? Quite simply, it is a device that can sense rotation. It's handy for changing aircraft and helicopter flight and response characteristics, since the model has to rotate when it's disturbed by wind gusts or maneuvering. We can use a gyro to reduce aircraft rotations and 'smooth things out.'"
Willar ME850 AVR programming system
Micro development system for AVR. (link)
Google translation: "Most mainstream system supports 51 computers and programming AVR microcontroller and experiment, using the whole open-modular design, materials can be used with any microcontroller, very suitable for the majority of colleges, individuals, engineers and technicians to learn and develop 51 / AVR microcontroller needs!"
Tuesday, November 9, 2010
RC Newbie Rules
Newbie Rules: "7- YOU WILL NEED TRAINING GEAR. This is extra wide landing gear you attach to your normal landing gear. They reduce the chance of crashing while learning from 99% down to 95%."
Friday, November 5, 2010
AR Drone Flyers.com - View topic - Night Flight
AR Drone Flyers.com - View topic - Night Flight:
"I rigged some nice bright LEDs on my AR.Drone for night flying. It works great! Makes for a very cool 'ground effect', plus it helps the downward facing cam lock on for stabilization."
Monday, November 1, 2010
Peak Servo Current Tests
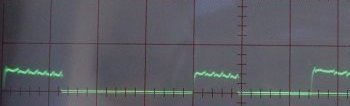
Peak Servo Current Tests: "Measuring servo current with a multimeter or Wattmeter won't tell you how high the peaks get. For this you need an oscilloscope, which traces a graph of instantaneous voltage vs. time. To convert the servo current to a voltage, I made a current probe with a 0.1 Ohm resistor inserted in series with the servo's negative power lead. I set the 'scope input attenuator to 50mV/div, giving a display of 500mA per division. The servos were exercised with a servo tester set for slow rotation. This simulates the small movements that typically occur in flight."
Sunday, October 31, 2010
The Pantheon by David Moore
The Pantheon by David Moore: "This famous building stands in the business district of Rome--much as it was built some 18 centuries ago. Amazingly, it has withstood the ravages of both the elements and war permitting a firsthand view of a unique product constructed by Roman hands. Now, it is exposed to acid rain and fumes from passing automobiles and overshadowed by buildings of inferior taste; but, with trust in the future, the Pantheon will survive."
Saturday, October 30, 2010
Differential ailerons
Differential ailerons: "There is a simple way of accomplishing differential aileron throws mechanically, by positioning control horns away from the hinge of the control surface. On this page we provide simple charts that allow one to measure and position aileron control horns to get precise maximum throw angles while achieving the desired differential."
Friday, October 22, 2010
what is DEPRON
what is DEPRON: "Depron is actually polystyrene (EPS/XPS) plastic and the (EPS) means expanded while (XPS) means extruded. For our purposes, we’re only interested in the stronger, denser XPS Depron which also happens to be closed-cell foam."
Depron Foam - Technical Information
Depron Foam - Technical Information: "Below are links to the current Depron Foam technical information:"
Monday, October 18, 2010
Untitled Page
RP Flight Systems: "The Spectra line of unmanned aircraft have been developed as an 'unclassified' asset, meaning there are no 'dual use' or military equipment installed that would produce data that would have to be 'declassified' before distribution."
Friday, October 15, 2010
RC Glossary
The Ultimate RC Flying Glossary!: "This RC flying glossary contains some of the more common words and terms that you'll hear now and again when you're reading about rc airplanes, or you're down at the flying field."
Wednesday, October 13, 2010
Draganflyer X4 Four Rotor UAV Helicopter Aerial Video Platform
Draganflyer X4: "The small, battery powered Dragaflyer X4 gets you the same great aerial pictures that renting a plane can, but at a fraction of the cost. Avoid the hassle and expense of using a full size aircraft for projects that can be accomplished easily and economically with our Draganflyer X4 UAV." One of the original commercial units, and a steal at only $8,000!
Tuesday, October 12, 2010
Monday, October 11, 2010
Sunday, October 10, 2010
Thursday, October 7, 2010
Basic Servo Motion
Stick/Servo Relationship
Non-Reversing Installation
Plausible Rudder/Elevator Combinations
rudder L = CCW, R = CW aileron L = CCW, R = CW elevator F = CCW, B = CW
Non-Reversing Installation
rudder elev
servo stem horn servo stem horn
----- ---- ---- ----- ---- ----
left top left left top bottom
right top right left bottom top
down left left right top top
down right right right bottom bottom
up left top
up right bottom
down left bottom
down right topPlausible Rudder/Elevator Combinations
DRR/DLB (inverted, for ezflyer) LTL/RTT (flat, on top, 300s) RTT/RBB (2 rights, above and below wing) LTL/RBB (stacked, flat, around wing) LTL/LBT (left, high, up and down)
Best configuration for RET (rudder/elevator/throttle) flyer (e.g. Blu-Baby) with push rods on outside of plane
rudder elev servo stem horn servo stem horn ----- ---- ---- ----- ---- ---- left top left right top top
Tuesday, October 5, 2010
Balancing servo throws
from: Setting up your Airplane
Preferred servo orientation to maximize stiffness:
Linkage setup:
Preferred servo orientation to maximize stiffness:
Linkage setup:
- dimensions "A" and "B" are determined by what the plans call for with respect to the total movement of the control surface (up/down, left/right, etc.) and how much travel your servo has.
set radio for normal, high-rate throws. - at control surface, mount the control horn so that distance "A" is as large as possible -- about 1" or so for large aircraft, 3/4" or so for smaller airplanes; commensurately larger for giant scale or smaller for park flyers.
- deflect the control surface to the maximum the plans call for, and measure the (horizontal) distance that the hole in the control horn moves. Call this dimension "C".
- Using radio, center servo arm. run the servo to its extremes and measure the distance some particular hole in the servo arm moves. Choose the hole that is closest to dimension "C" that you measured at the control surface. The distance from the middle of the servo attaching screw to that hole is dimension "B".
- fix control surface in neutral position, and measure the distance between the hole on the servo arm and the hole in the control horn with the servo in its neutral position.
- manufacture a straight rod and attach it to those points.
- mount the servo, making sure that the servo arm is perpendicular to the control rod, as shown, and that the control horn is also perpendicular to the rod.
- turn on your radio again and run that channel to its extremes and measure the throws at the edge of the control surface. Now reference the plans for your model. Are the throws too much, too little, or just right? If too much, increase dimension "A" (or decrease "B"). If too little, reduce "A".
- the throws in each direction should be identical. If not, check that the setup is as shown above, with 90 degree angles at both ends. You may have to adjust the neutral on your servo, or bend the arm at the control horn, but try hard to equalize those throws!
- What you’re doing here is maximizing the utilization of your servo’s power. By using the entire rotation of your servo arm to cause the control surface to move its maximum distance, you’ve used the mechanical advantage of the servo to its fullest extent - all the power your servo has is being used.
- If you merely install your servo and rod without regard to the total desired control throws, and the distance "B" at the servo is longer than at the control arm, you will have to reduce the maximum servo arm rotation allowed in order to keep the control surface movement at the correct distance. Result: poor utilization of your servo's power—you’re only using part of it, and resolution suffers as well.
- If distance "B" at the servo is shorter than at the control arm, the opposite ensues, and you’ll most likely overdrive the servo, perhaps causing binding or other equally devastating problems, or you won’t get the full throws desired at the control surface.
Monday, October 4, 2010
Sunday, October 3, 2010
Friday, October 1, 2010
Notes on prop pitch
Great write-up by Gordon Johnson:
http://www.rcgroups.com/forums/showpost.php?p=16189250&postcount=4
Sunday, September 26, 2010
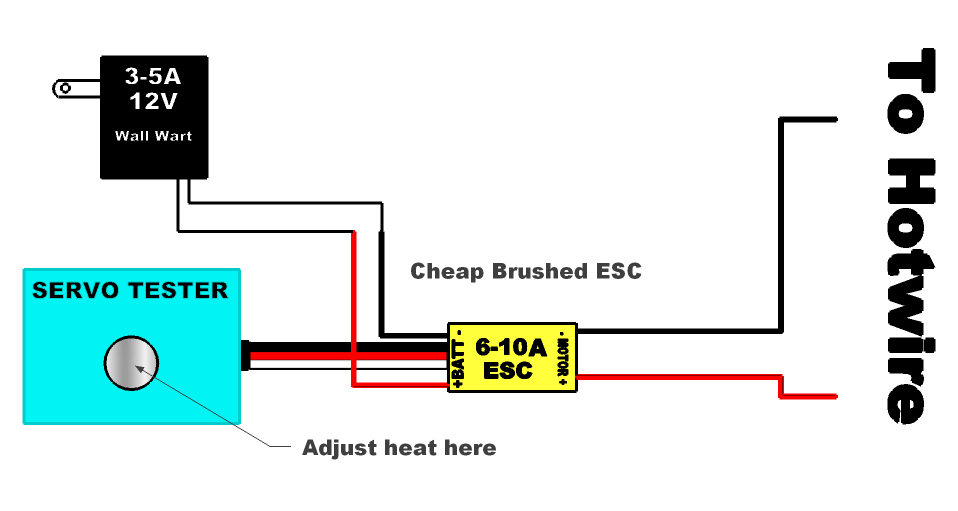
Simply Brilliant Hot Wire Cutter Power Supply
Saturday, September 25, 2010
BSD Micro - Small Plane Resources
BSD Micro RC: "BSD started in 1996 with our first product, a 2 gram ESC, followed by chargers for small NiCd cells. Today BSD is the Micro RC Specialist with a full line of micro equipment, kits, and planes in the under two-ounce category. We sell state-of-the-art equipment from firms like JMP Solutions, Falcon Models, Didel, Kokam batteries, EFlight Designs and others. We also manufacture our own BSD products like our BSD magnetic actuators, prop adapters, gearboxes, foam wings, and chargers."
A nice explanation of PPM radio signals
http://www.mftech.de/ppm_en.htm
Interestingly, the radio transmitter and receiverr does no transformation of the signal between the encoder and the servo.
Wednesday, September 22, 2010
Vendor: RCTimer Online RC Store
RCTimer.com:
"RCTimer Power Model Co.,Ltd, was established in 2003 in ShenZhen city, Guangdong Province, China as a professional manufacturer for R/C accessories of model toy's applications. As a master in hobby industry, we always do our best to improve our designs concepts & manufacturing technologies. We offer a wealth of manufacturing experience & technology with the expertise acquired over the past 5 years. We are constantly enhancing our R/C EQUIPMENT and ourselves according to the professional suggestions offered by our respect customers, in order to bring superior and innovative products to the customers from all over the world."
Notes on cutting BluBaby 33
Some build notes on cutting BluCore:
- really sharp blade. box cutter is fine, the thick blade makes it easy to make straight cuts. there aren't enough tight curves where you will need a thinner blade.
- make two bodies at the same time if you have the foam, if you want the practice
- when laying out, flip the wing and body templates so you will have left/right sides with the good side facing out
- lay out the wings so that any foam "ripples" run longitudinally (left/right) across the wing.
- some pieces have an "inside" and "outside" (body, bulkheads). cut these from the parts of the foam with lots of ugly printing, so that the printing is hidden on the inside.
- some pieces are exposed on two sides (wings, elevator, rudder, stabilizer). Cut these from areas of the foam that look nice on both sides.
Tuesday, September 21, 2010
Concord Model Engineers
CME: "Weekly (Sunday) Fun Flying at the end of Court Lane, Concord (Electric only)
Our Club Meetings are held currently at 7:30PM on the second Tuesday of the month at the Buchanan Airport Terminal Bldg.
(Near the Control Tower)"
Our Club Meetings are held currently at 7:30PM on the second Tuesday of the month at the Buchanan Airport Terminal Bldg.
(Near the Control Tower)"
Monday, September 20, 2010
Pager Motors
Here's some links about 4mm and 8mm pager motors.
- recommending a GWS 2508 prop, with some data.
- different models at pagermotors.
- google for "namiki pager motors"
- lots on ebay, seems about $15 including shipping for 10 units.
Friday, September 17, 2010
Things I'd like to try: The Simple Delta
Things I'd like to try: The OmniWing
A two-time world-record paper plane distance holder, folded from a single piece of paper.
Bluetooth GPS Logger
On Ebay, labelled as "GBTGP-38KM 65CH Bluetooth GPS Receiver+Data logger".
"a high-tech product combines the advanced Bluetooth technology and GPS technology. Through, Bluetooth technology, you can receive and storage GPS data through intelligent mobile phone, PDA, laptop and desktop. Can be used for location,navigation,read the history of track records, and other applications."
Plantraco: Really Small Planes!
Plantraco Microflight
This is the place to go for tiny planes. Check out the soldering video... "10-20x binocular magnifiers recommended."
Wednesday, September 8, 2010
Making a Carbon Fiber Push Rod
What you need:
Make the push rods:
measure length required
- carbon fiber rod, 2mm, cut to length
- 2 pieces music wire, .032i inch (.81mm), 2 inches each
- screw thing: 1.5mm
- 5 minute epoxy
Make the push rods:
- measure length required
- cut CF rod, length = measured length - 1 inch (wire will make up remaining length) using dremel cutoff wheel.
- cut 2 pieces of wire, 2 inches each
- put a tiny irregularity (bend) in one end of each wire. this will go into the CF tube, and provides something for the epoxy to hold against.
- clean wire
- mix 5-minute epoxy
- epoxy wire into CF rod, 1 inch. don't forget to put the tiny bend into the hole.
- after the epoxy has dried, tug on the two wires to make sure they don't slide out of the hole. If they do, you didn't do a good job on the epoxy.
measure length required
- Z-Bend one wire.
- attach z-bend to servo. (then you don't have to drill out hole in servo arm).
- drill horn to fit 1.5mm screw thing
- attach screw thing to horn
- put straight wire into screw thing. you can get clearance by pushing servo arm away from the control surface, and pushing the control surface away from the servo arm. this will give you just enough clearance for the wire to go into the screw thing hole. if there's not enough clearance, your wire is too long and you should trim it down to the proper length where it just fits in.
- turn on servos so they are centered
- align control surface to neutral position
- screw down screw things
Saturday, September 4, 2010
Giant Cod guides
Here's the battery guide. There's some others that look like they might be interesting.
Connector Mania: All Kinds of Connectors
http://www.maxxprod.com/mpi/mpi-3.html
including trainer cords.
"No matter how you call it - BEC, JST, or P connector, YES, we have these little RED connectors! This connector is also used in many park flyers power pack. For male order 2830, for female order 2832, for 6" Ext. order 2836, for switch order 2770, for Rx Batt. Box order 2911."
Connector Mania: Deans to XT converters
Here's a nice idea... instead of snipping your batteries and attaching Deans connectors, make a converter so that you can connect your various batteries to your ESC.
If you've read any of my earlier posts, you can see that I'm in equal measure obsessed with and confused by connectors. I think I've finally got it all figured out. Later I will post my Grand Unified Theory of Connectors.
Wednesday, September 1, 2010
HowTo: Using a Watt Meter
The instructions in the package are pretty inscrutable, so here's a quick HOWTO.
Basic Idea
- This thing sits between your battery and your ESC.
- It measures voltage, amperage, and wattage.
- It has a HOLD mode that keeps the highest values.
- When it's set up, you fiddle with your props, motors, etc, and see the power requirements of various setups.
- You can send it aloft to record the flight's peak power requirements.
- The unit doesn't come with any power connectors, so you need to attach your own.
- The wires labeled IN attach to the battery. Put a male power connector here.
- The wires labeled OUT attach to the ESC. Put a female power connector here.
- Black wire = Neutral (-)
- Blue wire = Hot (+)
- Plug the unit into a battery. Whatever battery you use to fly a plane is fine (the manual says the voltage rage is 8-30V, but it seems to work fine with 2S batteries as well, as seen below).
- The display of the unit will turn on.
- If you use a 2S battery, you will see something like this:
- Voltage (U=7.93V). Over time this will go down, as your battery discharges.
- Amperage (I=0.1A)
- Wattage (P=1.0W)
- Attach a motor to your ESC.
- Plug your ESC into a receiver. It's OK if there are servos attached.
- Attach the OUT wires to your ESC.
- Your setup should power up and work as normal.
- The power levels should go up a bit, since you're running servos and a receiver.
- Wiggle your servos. You will see the numbers jiggle in response.
- Make sure your motor is secure, and bring the speed up.
- You will see the amperage (I=) and wattage (P=) increase.
- Bring the speed back down.
- You will see the values decrease back to the original values.
- The voltage may have gone down a bit, since you've been using some power to run these tests.
- HOLD mode will measure the Peak values.
- To turn it on, click the HOLD button.
- Rev your motor and bring it back down a couple of times.
- You will see these peak values displayed. Rearranging the order a bit, they are:
- P 14.3W -- maximum power (wattage). This is the peak power output of the battery.
- Up 7.71V -- voltage when P was at max.
- Ip 1.9A -- amperage when P was at max.
- Im 1.9A -- maximum amperage, even if it didn't correspond to P above.
- Um 7.84V -- the minimum voltage of the time period.
- Click HOLD again to go back to instantaneous mode.
- If your plane is big enough to carry a couple of extra ounces, you can attach the meter between the battery and ESC in your plane, set HOLD mode, and find out your peak usage aloft.
- If you have a good quality multimeter, you can adjust your unit's readings.
- Depress HOLD for three seconds and you will be in adjustment mode.
- Measure an unloaded power source with both the watt meter and your reference multimeter.
- Use the ADD and SUB menu items to make the two units agree.
- SAVE will of course save your calibration.
Subscribe to:
Posts (Atom)