Here's my FrSky module. HK was out of the new model with telemetry, so I got the older model from Range Video. Once the original 9x module was removed (more on that below), it was a simple matter to plug in the transmitter module and bind to the two receivers.
I got the patch panel as well.
Here's how the patch panel looks when installed. I'll experiment with the range, it may be necessary to hold the transmitter a bit higher than usual?
Here's what the transmitter module looks like from the side. Very nicely, the antenna mount points forward and there's a flat surface for the receiver to rest on.
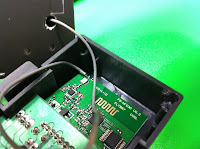
Here's my rejiggered 9x module. I should have taken some pics of the disassembly, but it's pretty straightforward. Open the Rx case and loosen the screw that holds the antenna. Open the module and remove the board. Unsolder the antenna from the board, and remove the antenna and wire. Don't bend or break the wire, it's actually a coax cable soldered onto two pads on the board. Once the 9x module has been removed, you're good to use the FrSky module.
I drilled a hole for the coax and ran the antenna through. I epoxied the antenna over the hole, scoring the module cover and drilling some extra holes around the base for the epoxy to hold onto.
Here's an alternate method for removing the antenna that doesn't involve unsoldering and resoldering the connection.
Resoldering the antenna cable needs a bit of care. The two parts of the coax cable need to be soldered onto the two pads of the circuit board. Study the board carefully before unsoldering and you'll see what needs to be done.
It turned out to be a lot easier than I thought it would be. I didn't have to add any more solder or flux. Hot glue the board into place as it was.
Here's what it looks like from the bottom. Not quite as well as nice as the flat bottom of the FrSky module, but it doesn't seem to be too bad. I'll point the antenna straight down when flying.


No comments:
Post a Comment