Here's some notes on elevon mixing with er9x. It's pretty simple once you know the basics. Here's some background on how elevons work. Check out the calculations page... I think it's the only page on the Web with the mixing formulas -- at least as far as I could find!
Here's the mix. The right and left elevons are on channels 2 and 3, respectively. Note that the +/- values of the mix will be determined by the servo installation, so follow the technique on the video to make sure nothing is reversed.
You have a couple of choices to enhance the strength of the wing spar.1. Drill (see 1a) out the spar hole and put in an 8mm CF.1a. To make a "drill", wrap and glue a piece of 80 (or60) grit sandpaper on the end of a 7/16" dowel rod and drill out the spar hole - takes about 30 seconds.1b. Install new 8mm CF spar with the old 6mm spar slid inside it.1c. OR - put 3-3mm CF tubes inside the new 8mm spar.2. Almost as good - Put a 4mm CF tube and a 3mm tube inside the existing 6mm stock tube.
This post is mainly for my own convenience, listing out the software I've downloaded to do thing 3D-printerish.
MakerWare -- driving the MakerBot (update: ReplicatorG is better, use it)
ReplicatorG -- an open source alternative to MakerWare
SketchUp -- for drawing objects
OpenSCAD -- for programmatic generation of objects
Sketchup STL import/export -- plugin to import/export, here. (update:If you get an error on import, it's most likely that your plugin directory is not writable.)
Here's one that even stronger... the 10 inch prop requires you to cut into the tail boom a bit. Andreas and I are hoping that the extra power will be worth it when it's full up on FPV and autopilot gear.
(note: this motor has a limit of 32 amps, and as configured it hits 30 amps on the bench... be forewarned!)
BTW, regarding servos... you need 6 if you do the flaps. I'm pleased with these. If your radio can handle the mixing, you can use two channels for the flaps. Otherwise, get a servo reverser.
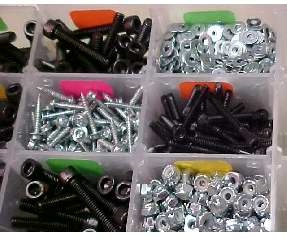
RTL Fasteners has a great collection of metric fasteners at what seems to be a pretty good price. Way better than the local hardware store, where they seem to believe that M2 and M3 fasteners are made from 24K gold! The have a giant super-pack as well.
Here's the Small Parts motor mount extension I got for the Bixler 2. It's rated for up to 9 inch prop, but following Andreas' lead I trimmed a notch in the Bixler tail and fit a 10 x 4.7. It draws 30 amps off a 3S battery.
HK now has a similar mount... no idea how it works, but it's certainly a bit cheaper.
Some notes on HD keychain cams. #16 v2 seems to be the good one. eletoponline365 seems to be a good vendor. The "D" lens seems to be popular for FPV coz it gives a wider field of view.
Cheap GPS hackery here. Very interesting, and it can save on some projects. Ebay searchage for "U-blox PCI-5S" and "GPS Ceramic Internal Patch 1575.42MHz Antenna 20x20x7mm" about $15 combined!
I do a lot of construction and repair with Beacon Foam-Tac. It's safe on all kinds of foams, doesn't have stinky fumes, dries quickly, doesn't yellow, and maintains a rubbery, resiliant quality.
I broke off the nose of my F-22 yesterday, and thought I'd document the repair. EPP foam is great for this kind of disaster. I applied the Foam-Tac to one surface, mashed and unmashed the surfaces together, let dry for a few seconds, and made the final join.
In under an hour the joint is firm. I think the directions say to let it cure for 24 hours for maximum strength. As you can see here, it's nearly impossible to see the repair line.
Here's a video of the process. Made with my new downshooter!
Here's my new downshooting rig! It's always been a serious pain to set up a tripod on the workbench to shoot, because it takes up all the room on the workbench! I saw this instructable, and here's my version of it. The clever bit is using the two linked pipe clamps to make the 90 degree connector for the boom.
I followed the instructable pretty closely. I used 1 inch dowels for sturdiness, and didn't bother embedding the tripod mount, since I've got an iphone tripod mount already. Instead of using wire to attach the camera holder, I just cut the dowel and used glue. I liked how the instructions for aligning the iphone brackets use the iphone itself, wrapped in a plastic shopping bag, which doesn't stick to the epoxy.
Here's a shot showing how I cut and glued the camera bracket. I used PU glue (white gorilla glue) which was quick and filled up the gap from my crooked cut.
If the shaking is too bad, I'm going to mount the leftover bit of dowel as shown here (using two more pipe clamps) and brace the rig against the wall. Hopefully that won't be necessary.
Here's a still shot. The still camera has a wider viewing angle than the video.
Note: the camera was in portait mode, so I had to rotate this and the following pictures. Be sure and put the camera in landscape mode if that's how you want to shoot.
Here's a shot where I was bumping the table. It seems it may not be as much of a problem as I had feared.
Here's a shot while the rig is vibrating up and down. Even with this, there's only a little distortion.
And a shot while the arm is oscillating side to side. I gave the rig a pretty strong tug, far more than would ever be caused by a simple bump. Watch this in the video, it's pretty alarming!
Overall, it looks like it might work pretty well, at least based on this first impression. Here's a video showing the rig and taking some test videos.
Here's an interesting idea... a pendulum-style camera mount, where the weight of the camera is counterbalanced by the weight of the battery. I've found two models, both of which have lots of videos and details at the links.