So Crash Hancock recently issued a cheapie quadcopter challenge. He did a great job on a cheap blue wonder based propulsion system, and of course the $15 flip control board is the obvious way to go.
He ended up paying less than $10 for the frame parts... quite good, but it occurred to me you could do better. While mulling this over and trying to think of cheap arms, I happened to notice some rulers in our office copy room.
Eureka! They were just the right length, and using some jumbo clips held them together nicely. I had some a zip tie sitting around, so after clipping everything together I wound a zip tie around everything. As you can see, it makes a very stylish looking X copter, with about a 30 second build time! Surprisingly, it's a very stiff frame, and very crashproof (I think), since everything will just pop apart, ready to be reassembled.
I was planning to screw the motor mounts onto the arms, but it occurred to me that they would look pretty odd when I returned them to the supply cabinet. No problem, a couple of more clips hold the motor perfectly. And several cents saved on fasteners! As soon as I get some more motors and a flip controller, I'll finish it out. Until then, everything back into the cabinet, ready to be reassembled!
Showing posts with label ghetto. Show all posts
Showing posts with label ghetto. Show all posts
Thursday, July 4, 2013
Sunday, April 8, 2012
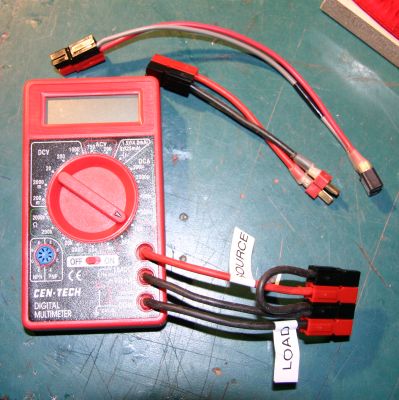
Three Dollar Wattmeter
I've got a watt meter, but if you're wanting to measure your power system on the cheap, here's a link to the classic $3 Wattmeter based on the ubiquitous Harbor Freight digital voltmeter.
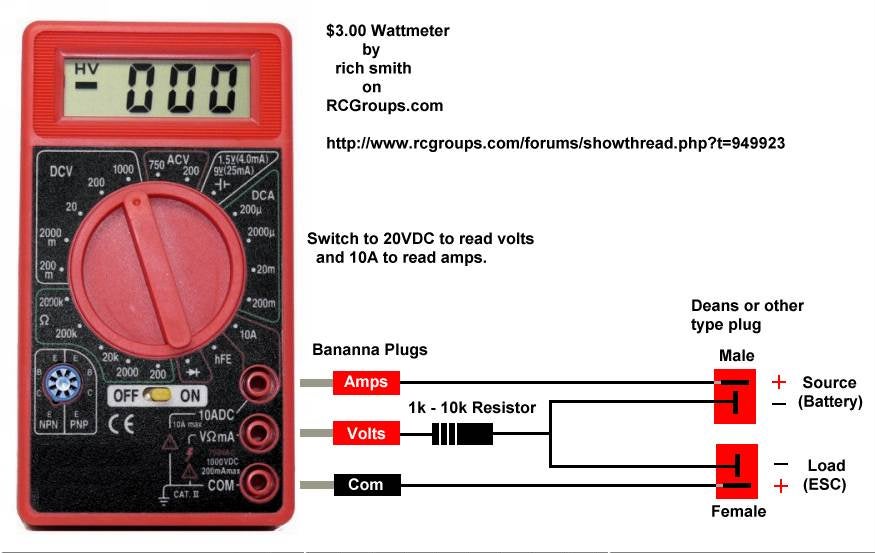
Basic Idea: add 14 gauge wires, attach to connectors of your choice, and wire in a 1K-10K resistor to protect the circuitry when flipping through the millivolts settings.
The stock wires are good for up to 10A, and with the replacement wires it's good up to 20A.
Jackerbes has some nice construction photos. critterhuner has some here.
Here's a wiring diagram.
You could run two of these in series, one measuring voltage and one measuring amperage for six dollars.
And Lucien has a nice writeup on cheap power shunts that will extend the current measuring range up to 55A continuous and 100A burst.
For those interested in learning more about watt meters, check out my link above. Here's the manual for the well known Watt's Up unit.
Sunday, February 26, 2012
Sky Stick -- what to do with your Busted Hawk Sky
When it's crashes its final crash, what can you do with a smashed Hawk Sky? Turn it into a stick of course!
Sunday, January 22, 2012
DIY FPV Goggles Update
Part 1 here...
Here's the current state of the DIY goggles. The distance to the screen seems about right for use either with or without glasses.
Here's the view from the inside. The screen has a resolution of 320x200. It was $21, and looks about like you'd expect for that price. If it seems like a viable solution, I'll order a better screen.
Here's how it's attached... It was pretty straightforward. I was going to make a slot down the metal strap so I could vary the distance easily, but this distance seems to work pretty well.
Next steps: make a lightproof cover, figure out how to attach the battery and wiring, make a convenient connector to the receiver.
Wednesday, January 18, 2012
DIY FPV helmet, Part 1
I'm having problems fitting FPV goggles, coz I wear glasses. So, based on an idea from Bruce, I'm going to try making my own ghetto version by attaching a video monitor to a welding helmet.
Here's the helmet I'm using. It was about $16 from Amazon, including shipping.
Here's the welding glass cover pieces removed. Now there's just an empty frame in the welding helmet.
If I'm able to focus closely, I'll be able to attach the video screen right to the helmet. This will be convenient coz I'll be able to flip it up.
I don't think I'll be able to get the monitor that close to my eyes, though. I'll experiment to see the most comfortable distance with and without glasses.
Here's the headband. It fits well and can be snugged up comfortably. I think it might be better in this respect than commercial FPV goggles.
Here's the head size adjustment screw. There's also an adjustable strap that goes over the top of the head as well.
And it's stylish!! I'll take the inventory tag off, but I'm not sure how much it will help. I'll also consider cutting the lower part off so my mouth is not covered. It will make it easier to talk, and possibly keep my breath from fogging the inside of the display.
Here's the 3.5 inch monitor I'm using for the first test. It's the cheapest monitor on DealExtreme. Resolution: 320x200, 12V. It's not bad, but about what you would expect from a $22 monitor.
Here's how I'm thinking of mounting the monitor on the helmet. I'm thinking I can screw my hatcam on top as well.
Part 2 here...
Sunday, July 17, 2011
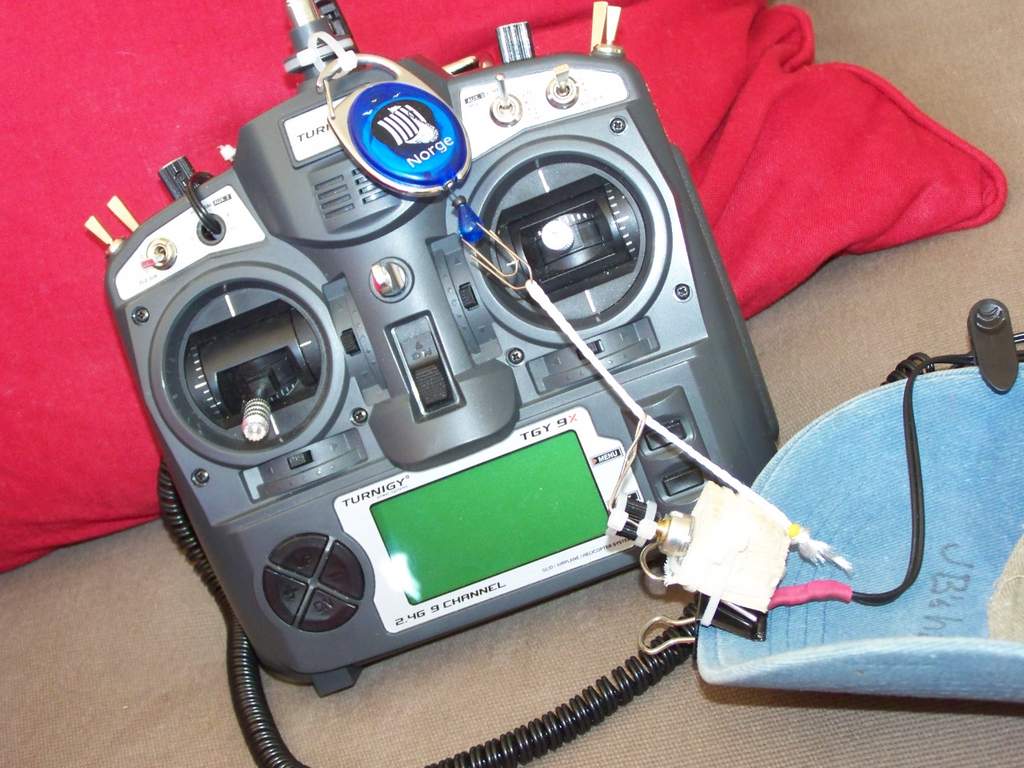
ScrtSqrl's cheap pan-only, crazy-simple, zero-drift Head Tracker
Here's the original CGroups link and an update where ScrtSqrl unveiled his nifty head tracker. Genius!
Basic Idea:
Vimeo link: http://vimeo.com/925056
Basic Idea:
- take a control (e.g. flaps) pot out of your radio
- extend the wires so it will reach your head
- add a lever and attach it to your hat
- add a bungee cord, attach to your radio
- attach cam servo to appropriate channel (e.g. flaps) on radio
Vimeo link: http://vimeo.com/925056
Tuesday, June 14, 2011
Replacement Tripod Mount
A while back I lost the head from my el cheapo tripod. I couldn't find a convenient replacement head, so I carved one out from a piece of wood. A counter-sunk stainless steel bolt attaches it to the camera. I cut an angled edge on the front, and gouged out a little spot in the back for attaching it to the tripod.
I thought it would be a stopgap measure while I found a real replacement head, but it turned out to work so well I just kept using it.

Saturday, January 29, 2011
$2 quad frame!
YouTube video
Writeup and details
Based on the UAVX.
Frame: 15mm 'U' channel aluminium pipe
Central plate: 'Wall mount plate of Electric Bulb Holder'
Total frame cost: less than US$2
net weight of frame: < 800g.
battery: 2500mA 3S 25C
motor: r2hobbies.com Turborix 750 rpm/v DAT-750 RC 800g Plane Outrunner Brushless
ESC: himodel.com, 40Amp
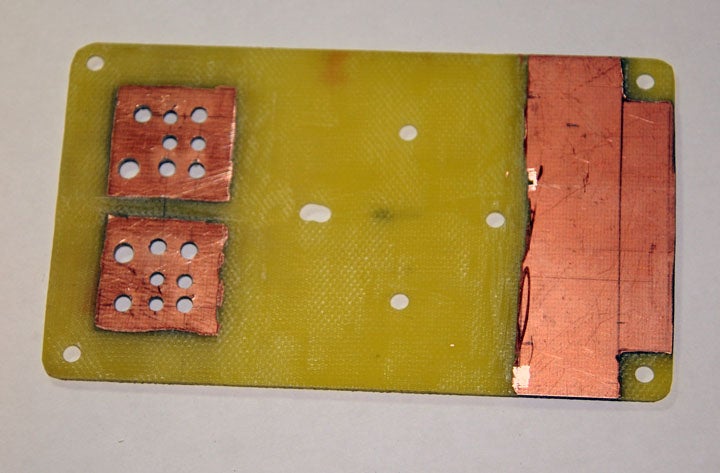
ghetto PC board: sand off the copper layer!
ArduPirates build: "Ideally, the power distribution board should have been made like PCB's are usually done. But I did not want to meddle with FeCl and the long preparation process (may be I'll do it some day). So I sanded off copper layers with Dremel except two square areas."
Sunday, July 11, 2010
Interesting uses for bamboo skewers
Control Rods:
and Wing Reinforcement:
I split them lengthwise with a razor blade, and then glue the strips to the leading edges. You get reinforcing and a rounded leading edge in one operation.
And an awesome reinforced fuse.
more
http://www.rcpowers.com/forum/showthread.php?t=1251
Or you can cheap out and use 150 for $0.99 bamboo skewers, some paperclips and shrink tube. I zip tied a tooth pic to one of the paper clips that I made too long and was flexing.
courtesy of jakezilla
and Wing Reinforcement:
I split them lengthwise with a razor blade, and then glue the strips to the leading edges. You get reinforcing and a rounded leading edge in one operation.
And an awesome reinforced fuse.
more
http://www.rcpowers.com/forum/showthread.php?t=1251
Subscribe to:
Posts (Atom)


