Thursday, November 29, 2012

Got the ar.drone node.js stuff running!

More details to follow, but some quick notes on what we needed to do to get things up and running.  Got up to the suggested first steps, having an application capture video from the ar.drone front camera and do facial recognition.  Images were fed out through a node.js server, which I thought was a pretty clever idea. I'm so happy in the picture coz it took about an hour to figure out how to get the image displayed.  If you're in node.js, serve it up in a browser!

In case you can't puzzle it out, the circled object is Andreas' face, as detected by Open CV. Detection parameters were set to "boyish good looks" of course!

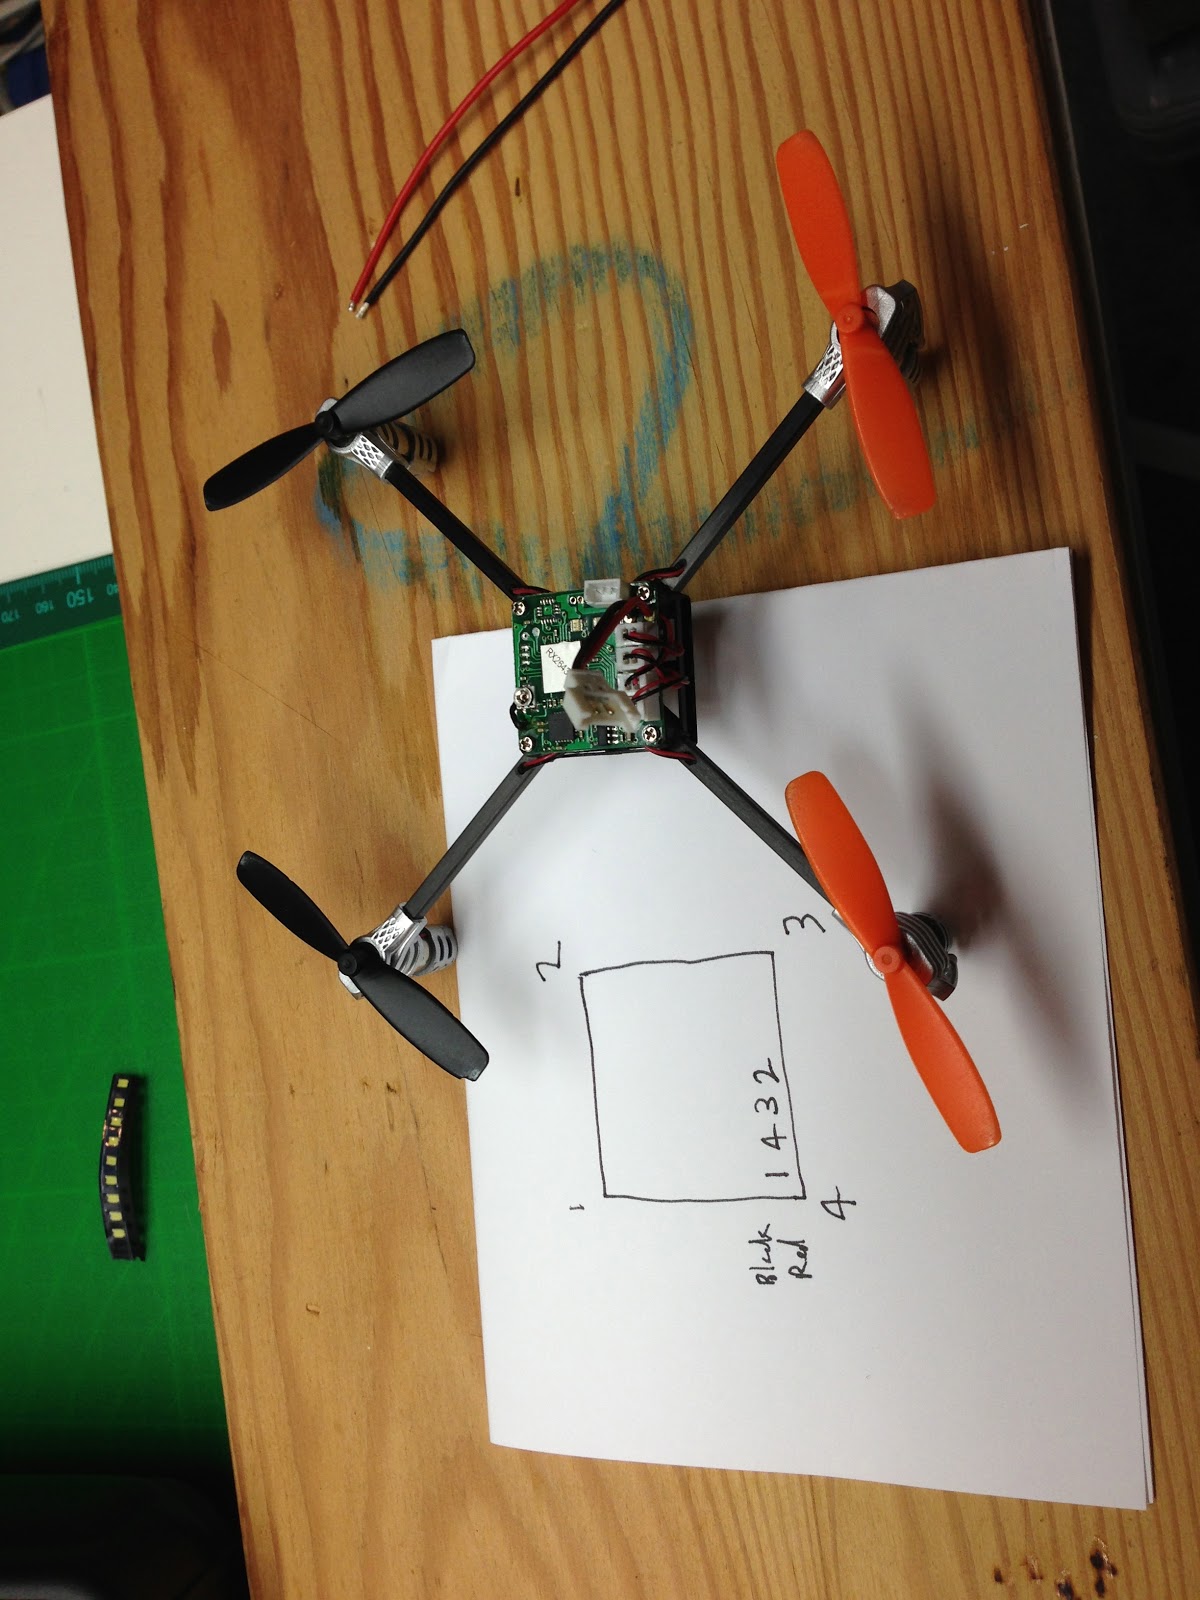
So, we're on track for the droneolympics on Saturday!  Andreas is working on a PID package which looks pretty good so far. I was pretty happy with our progress... we basically started on Wed and last night was the first time we had an ar.drone to work with.

Here's a video of the first test flight, running the example ardrone program.


Following is some blabbage on what I did to get the software installed and running on a mac.  After spending 30-40 minutes trying to figure out how node.js packages work, I ended up hardcoding paths to everything... I'll try and fix that later.


NODEJS
    node-v0.8.15.tar.gz
    configure --prefix=/Users/mh/nodejs
    make; make install
    export PATH=/Users/mh/nodejs/bin:$PATH

OPENCV
  OpenCV-2.3.1a.tar.bz2, as per nodejs opencv docs
  edit CMakeLists.txt
  ## change /usr/local to /Users/mh/nodejs
  cmake -G "Unix Makefiles"; make; make install
  export DYLD_LIBRARY_PATH=/Users/mh/nodejs/lib

ARDRONE
  npm install git://github.com/felixge/node-ar-drone.git -g

NODEJS OPENCV

  ## https://github.com/peterbraden/node-opencv
  ## requires OpenCV 2.3.1
  npm install opencv -g
  ?? export PKG_CONFIG_PATH=/Users/mh/nodejs/lib/pkgconfig


Wednesday, November 28, 2012

Weekly Miscellanea

In which we close out browser windows which have been naggingly left open...


Sunsky has good prices on LEDs.  In particular, they carry ropes with 60 and 120 LEDs/m.  They've also got an LED controller for under $3.


Nifty swappable joysticks on a small Tx.  I've been wanting to fiddle with a tank-like controller for an arduino ground unit, but keep getting stuck on the asymmetric sticks.  I keep hoping to find a supplier of 9x sticks!


Banggood has some stranded 32 gauge wire in short lengths for $1, including shipping.


Lemon Rx (what a name!) has a DSM2 compatible Rx that has a UART and looks pretty nice for hooking up to projects with a real CPU.  Connection is 9600/8N1, and provides stick positions at 50 Hz with a string like this:


    [0x13][Ail][AUX][Gear][Ele][Thr][Rud][0x13]


where each value is an octet between 100-200.  More details at the link.


There's a PPM port too!


A nice idea for homemade nanoquad motor mounting.  And check out the handmade MultiWii FC!


Servo Magazine looks interesting and is recommend by Chris.


Prince of Dubai's Impressive RC Hangar

Literally, a hangar.  Jim Smith of 3D Hobby Shop sold him a plane, and as part of the deal was flown over for some lessons and a demo.  FedEx 2nd Day Air shipping cost? A cool $5k.  Lots of nifty pics and the rest of the story over at Giant Scale Forums.


My favorite bit?  Besides a foamy wing with (presumably) one's self-portrait, the fact that even a prince with his own hangar has to charge his batteries on some overloaded power strip!


blogodex = {"idx" : ["Dubai", "3D Hobby Shop", "Jim Smith"]};

Tuesday, November 27, 2012

Things To Try: the Nifty

The Nifty, by Dave Reap.  32'' with 6mm depron, 24'' with 3mm.


"The nutball is one of the best fun designs Ive found, I think suitable for beginers and great fun for more advanced fliers...I always plug the big ones, and have more than a few now..A 36" KFm4 is my latest build and I love it.. This plank will fly steady ..check the circuits in the middle part of the video.. but it will not self right itself like the nutball does, and it does not have the fantastic slow speed harier like stability. The plank will stay in the attitude you put it, which means you have to fly it all the time, but it does not give you any problems because its so smooth in what it does..vTo fly this you need to be ok with flying ailerons and elevator, and past the need to have the stability that a nutball gives you.."

Things To Try: the Albatross

The 48'' Albatross and smaller 36'' Pelican are both designs of the ever-awesome Lee of CrashTestHobby.com.  Check out the videos on the RCG thread.


"The Albatross offer many possibilities for newer flyers or advanced flyers who want light weight FPV, night flying, indoor flying, slope soaring, aerial photography, and flying in small parks where low noise levels are needed. No one is going to complain if they don't know you are flying."


Friday, November 23, 2012

Nice MultiWii Boards

Ready To Fly Quads has some nice MultiWii boards for sale.  Follow the links under FC boards.
Here's the connection diagrams, just for convenience.
RCTimer also carries MultiWii boards.


Thursday, November 22, 2012

Binding Spektrum DSM and Turnigy OrangeRX Receivers


Here's how to bind a DSM{2,X} transmitter and receiver.  This applies to both Spektrum and OrangeRX units.


Safety First: Remove your props.  If you screw something up, your motor could unexpectedly spin up at 100% power.  That's an uninteresting problem to resolve.

Setup
  • Remove props.
  • Power off Rx, Tx.
  • Make sure ESC is plugged into the THR port of the Rx.
  • Plug bind plug into Rx bind port.  Polarity does not matter.
Binding
  • Power up plane.  The Rx LED should fast blink.
  • Move Tx sticks into desired failsafe position.  Most importantly, make sure THR stick is at lowest position.
  • Press and hold Tx bind button.
  • While keeping Tx bind button depressed, power on Tx.
  • While keeping Tx bind button depressed, wait for Rx LED to go solid.
  • Release Tx bind button.
  • Power off  Rx.
  • Power off Tx.
  • Remove bind plug from Rx.
Testing
  • Power on Tx.
  • Power on Rx.
  • Controls should be operational Fiddle with sticks and adjust Tx settings appropriately.
Testing Failsafe
  • Adjust throttle so that motor is spinning.
  • Move sticks so that control surfaces are deflected.
  • Power off transmitter.
  • Motor should stop spinning.  Depending on your Rx model, the control surfaces will either stay in place or return to the failsafe positions set while binding.
  • Power on transmitter.  Stick control should resume.
Range Testing
  • Attach the model to the ground.
  • Move away 90 feet.
  • Press and hold the Tx Bind button.  This puts your Tx into reduced power range test mode.
  • Ensure all controls work as expected.

Monday, November 19, 2012

Source: FS-TH9X-B-Module +Antenna

I've been looking for this for a while... just the FlySky module for the 9x.  $21.50 at the time of posting. At rcmodelpart.com.

Saturday, November 17, 2012

Ladybird Repairs

 Here's the before picture.  The mainframe was cracked, and more importantly the motherboard wouldn't bind.
 Here's the unit with the motherboard removed.  The four screws come out pretty nicely.
 Here's the repaired frame.  It took a bit of jiggling to get the arms to seat properly.
 And all put back together!  It flies as nicely as it did before on my desktop testing.  I replaced my V1 board (which has an accelerometer) with a V2 board (which doesn't).  I'll see how well it flied in real life and see if I want to get a V1 replacement board.  They're more expensive because of the accelerometer.
Here's the wiring diagram for future use.

SMD LED Notes and Tester

 Here's some more information on SMD LEDs.  First, they are small. really really small.  And impossible to tell apart regarding the color.  To sort out the colors I received in a package, I put together this LED tester.  It's got two servo pins to pick up and power the LED, and a 120 ohm resistor so that it can be powered by a 1S lipo.  So far it's working well, and the tips don't touch when the tweezer is squeezed together.  Everything's assembled with shrink tube.  Be careful, because if the LED slips (as I learned by hard experience) it will shoot out of the grip of the pins and be long gone.

Here's the resistor values I'm using, based on the LED data card from the ebay vendor.  Two nice resistance calculators are here (with color codes) and here (with parallel and series calculations).

Friday, November 16, 2012

3D-printed Micro Quad

My friend who helped me out with the prop rings brought a 3D printed quad frame he had made with his high resolution 3D printer.  It seems pretty nice, and the arms are definitely sturdy enough.
There's 4 arms, a top plate, a base plate, and 4 feet.  After printing everything out you can glue them together with CA.  We had lightly glued everything together at the conference so people could see the results. Two of the feet came loose and got lost on the way back home.  I may have access to another 3D printer soon; if not, I'll just cut out a duplicate from 1/8'' ply.
You can see a bit of the striations left over as an artifact of the printing process.  I'm not sure if that could be eliminated by proper tuning or if it's a limitation of some part of the printing process.
I'm not sure of the materials cost of this piece.  It may be high enough, or the printed frame may be heavy enough that there's not a distinct advantage over buying a frame kit (for this size about 12-15 dollars) or using a material such as 3/4'' basswood.  I certainly intend to explore this further in any case!


More info on the quad design by Adam Polak here:
http://www.thingiverse.com/thing:29632
http://polakiumengineering.org/?page_id=1793
http://polakiumengineering.org/?page_id=1989

3D-printed blade guards

I recently attended a conference where one of the conferees had a makerbot and was offering to 3d-print items for people.  I was pretty excited about this -- in addition to being my first real-life experience with a 3d-printer, I had just seen the ladybird prop guards that had been uploaded to thingiverse and really wanted a set.
So, just as has been described, we downloaded the STL file and brought it into the CAD package.  We flipped the blade guard over so the arm attachment part would be on the bottom, and duplicated it so that we would print 4 in one go.  All of that would pretty straightforward.  We then fiddled with some parameters regarding plastic thickness, print speed, etc.
You can drive the makerbot directly from USB, or you can generate and download (via memory card) the "tool paths" which are in "G code" (not sure about the details here, we were going pretty quickly).  The advantage of downloading (as it was explained to me) is that you're free to use the software to continue working, and that sometimes the printer will stall waiting for data.  Here you can see the print started by laying down a lattice that will make it easy to remove the pieces from the tape.
I'm not sure why we had the pieces of tape.  I'm assuming it made it easier to pop completed items off cleanly.

Here you can see the prop guards starting to take shape.  As you can see in the video below, the unit runs quietly, and it's rather hypnotic watching it  work.
This is a couple of minutes into the printing. The entire print took about 22 minutes.  Always put your product logo in a  prominent spot!
Here's what came out, after trimming off the substrate.
But there was a problem... one of the parameters was a bit off (I didn't hear which one), so the rings printed with a hollow void between the two sides.  I think if you glued the rings together with thin CA it would be strong enough to work pretty well.
But not necessary... because we have a 3D printer!  We bumped up whatever parameter and printed a new set with fully formed rings.

The ladybird is sadly waiting for a new motherboard, but as soon as I get it I'll put the rings on and follow up as to how well it works.

But for now, I have to say my first sip of the 3D printer koolade was pretty tasty and I'm looking forward to trying some more!


Tuesday, November 6, 2012

Monday, November 5, 2012

Sunday, November 4, 2012

New Battery Bunker

 Here's my new battery charging bunker.  It's a concrete block, with flats on top and bottom.  I chiseled out a slot for the wiring.  I'm going to try the "sand in bag" technique for the top.  The idea is that you put the sand in a plastic bag, and a fire will melt the plastic, smothering the battery.  I might keep the concrete flat on top of the bag, so it will totally seal.  There's a smoke detector on top.
Here's the reason for the new battery bunker.  It was a 3S 500, relatively small.  I'm pretty paranoid about watching over charging, so I was there when one of the cells popped.  I took it off the charger and examined it; within a couple of minutes smoke started coming out, so I tossed it out the door and it burst into flames a few seconds later.  I wasn't concerned with the leaves, because it was a rainy night and everything was soaked.  I've also got a fire extinguisher next to my bench; you should too!

Update: with the recent dry weather, I have a sand-filled bucket sitting outside the door.

blogodex = {"toc" : "Battery Safety", "idx" : ["Batteries", "Charging", "Safety", "Battery Bunker"]};

Attaching Props on the ArctiBaby

 Here's how I finally put my props on the ArctiBaby.  Start out by balancing the props.  They're too small for any kind of normal prop balancer, but hanging them on a paper clip worked fine. Plain transparent tape worked well for the balancing.

Then I reamed out the hole just a tiny amount, enough to start the prop on the motor shaft.  If I reamed out enough so that the reamer came through the top, it was too much and the blades would slip.
I then put the prop on the motor shaft and centered it.  I tried pressing it on by hand, but the props are pretty light and I worried I was giving too much stress on the blades themselves.

I put the bolts on a firm surface and lightly tapped them in with my smallest ball peen hammer.  I was worried I was going to bend the thin prop shafts, but it worked well with just a couple of taps.

Friday, November 2, 2012

Some quick er9x Notes

Here's a snapshot of my SmartieParts board installed.  For maximum fun, post on RCGroups and call it a SmartiePants!

Full er9x manual here.

Menu Quick Start
  • [LEFT LONG] : radio setup (six screens); stick calibration on screen 6
  • [UP], [DOWN], [LEFT], [RIGHT] : various display modes
  • [MENU LONG] : model select
  • [EXIT LONG] : reset timer
Some Mixes

Throttle Hold.
THR stick is passed 100% to channel 3; range -100 to 100
if throttle hold switch is off (up), the value -100 replaces the stick value.

    CH03   +100% THR 
         R -100% HALF Switch(!THR)

Ardupilot Mega, 6 positions on AIL DR, F.Mod.

    CH05   -96% HALF Switch(AIL)
           +90% HALF Switch(ID0)
           +45% HALF Switch(ID1)
           +17% HALF Switch(ID2)

ELE DR to channel 6.
I'll use this for the "find me" beeper.
If the switch is off, channel value is -100; if on, +100.

    CH06   +100%FULL Switch(ELE)