Out flying today and found out the Champ can Slope Soar. I was able to run for over an hour on a 160mAh 1s. Throttle for launch or getting out of trouble.
The soaring took place over near the Bulb in in I guess what you could call the Golden Gate Fields' North lot...where the beach access is for dog owners. You couldn't see in the video but it's the pathway coming down from the upper parking lot hill. There is a cliff facing the SF Bay that slopes from nothing on the North end ( right hand side of the video) to about 50 or 60 ft towards the South end. Cliff is about 100yds long where I was flying, then the road I was standing on and another cliff about 20 ft tall behind me so I could soar where the video was shot or loop around behind me as long as I was about 20 ft off the deck ( to avoid turbulence) and get some lift from that "cliff face" too.
The "Lift Zone" was about 20 yds upwind to 10 yds downwind of the cliff face and up to 10 yds above my head. Not terribly big but like flying in the corner of a football field. You can see it lose alt. near the end of the video that' the edge of the upwind "Lift Zone".
microcontroller reads inputs, does some processing, sends some output
different approach than "traditional" electronics
e.g. a button does not complete a circuit to light a lamp, but instead signals the microprocessor that the button has been pressed; the microprocessor then turns on the lamp
Makes circuits much simpler -- cookbook examples of wiring inputs and outputs to the Arduino are often all that is necessary.
Labs
circ08 - potentiometer. circuit diagram is confusing, it says "to pin 13 then to pin 9". That means use pin 13 for the first part of the lab, and in the second "making it better" part of the lab use pin 9.
circ04 - servos. two parts, sweep and knob input.
Errata
Rod Bogart notes a correction on lab CIRC-03:
    Note: There is an error with CIRC-03. Omit the 10K resistor and
    hook pin 9 directly to the base of the transistor.
Here's the current state of the DIY goggles. The distance to the screen seems about right for use either with or without glasses.
Here's the view from the inside. The screen has a resolution of 320x200. It was $21, and looks about like you'd expect for that price. If it seems like a viable solution, I'll order a better screen.
Here's how it's attached... It was pretty straightforward. I was going to make a slot down the metal strap so I could vary the distance easily, but this distance seems to work pretty well.
Next steps: make a lightproof cover, figure out how to attach the battery and wiring, make a convenient connector to the receiver.
These are the class notes for a 4-part, 8-hour class Introductory Arduino class I'm teaching. The class consists mostly of programmers fluent in C, which means we won't have to spend much time on the software side of things. A few of the people have some hardware experience; the majority don't. A couple of people are actually experts cleverly disguised as students, helping me out!
We're using the Sparkfun Inventor's Kit and tutorial. Each student is provided with a kit. I bought one of these for myself last year and thought it was a pretty nice kit. (update: The new version of the kit is even better. Onward and Upward!) After the last class I'll provide a wrapup with any notes regarding what pieces were more and less useful, and what supplemental pieces might be used.
general electronics -- electricity, circuits, etc.
arduino specific electronics -- input, output, digital/analog control, etc.
arduino programming and libraries -- C coding, libraries for doing interesting things
the big picture -- interfacing and combining the lower-level pieces of knowledge into useful or interesting projects
Topics Covered
electrical circuits: much handwaving
setting up the boards
naming of parts
downloading arduino environment
running the blink program
expanding the blink program to tricolor led
Notes
Needed to spend more time on breadboards, how they're laid out, how to complete a circuit with them, what the power lines are used for.
The Sparkfun project templates are nice, but don't bother attaching them to the breadboard.
Because you won't attach them to the breadboard, ignore the two-pin headers on the corners of the board. They're only used to attach the paper template to the breadboard.
We had one kit that had trouble making a connection -- it never showed up on the TTY list. It turns out to be a faulty USB cable. Fortunately this happened to one of our more intrepid students who diagnosed the problem right away.
All the other hardware worked with no problem.
The colors of the wires have no intrinsic meaning. You typically use red and black for power and ground, but interestingly the Sparkfun kit has no red or black wires.
Cover the software portion of the blink lab first. It looks like the Arduino people test the boards with the blink program, so when you plug everything in for lab 1 the LED starts blinking before the students do anything.
If you have access to the boards before you pass them out, it might be nice to download a null program to avoid this.
The wiring diagram for the first blink lab has a wire to the power bus that serves no purpose. This should be eliminated, since it caused students confusion as to what it was doing (nothing).
Khan Academy Circuit Tutorials
This is homework for the next class. Be cool, sign up for a Khan Academy account, and register me as your coach! My ID is http://facebookid.khanacademy.org/500063084
Here's an update on my lightweight Night Vapor batteries. I tried ordering some 50mAh cells, but they were out of stock and I got tired of waiting. So I went ahead to try making some more 70mAh batteries.
Here's the 1S lead soldered onto the cell. Notice the lead is a lot shorter than previously.
That's because I got some liquid tape, and didn't have to leave enough room on the wires to put shrink wrap.
I used a piece of craft stick to daub the liquid tape onto the exposed tab and solder connection.
Here's what the final unit looks like. The liquid tape seems to cover pretty well.
The battery doesn't fit into the Celestra charger as is, because the leads are a bit too short and the cell is a bit too wide. Using a 1S extension solves things nicely.
And it's certainly light enough... Flying the Night Vapor smoothly I was able to get 17 minutes on this battery, about 4mA per minute. I was impressed!
Update: this connector is a "Molex PicoBlade (grid: 1.25mm)"
I'm having problems fitting FPV goggles, coz I wear glasses. So, based on an idea from Bruce, I'm going to try making my own ghetto version by attaching a video monitor to a welding helmet.
Here's the helmet I'm using. It was about $16 from Amazon, including shipping.
Here's the welding glass cover pieces removed. Now there's just an empty frame in the welding helmet.
If I'm able to focus closely, I'll be able to attach the video screen right to the helmet. This will be convenient coz I'll be able to flip it up.
I don't think I'll be able to get the monitor that close to my eyes, though. I'll experiment to see the most comfortable distance with and without glasses.
Here's the headband. It fits well and can be snugged up comfortably. I think it might be better in this respect than commercial FPV goggles.
Here's the head size adjustment screw. There's also an adjustable strap that goes over the top of the head as well.
And it's stylish!! I'll take the inventory tag off, but I'm not sure how much it will help. I'll also consider cutting the lower part off so my mouth is not covered. It will make it easier to talk, and possibly keep my breath from fogging the inside of the display.
Here's the 3.5 inch monitor I'm using for the first test. It's the cheapest monitor on DealExtreme. Resolution: 320x200, 12V. It's not bad, but about what you would expect from a $22 monitor.
Here's how I'm thinking of mounting the monitor on the helmet. I'm thinking I can screw my hatcam on top as well.
Nice looking quad, the Aeryon Scout, used to survey the harbor in Nome following 27 ft snowfall. The Internet claims it runs about $30k - $50k. More here.
Got these from RangeVideo... these units are the older ones, that don't have telemetry built in. That should be OK for me, since I'm planning on using APM for the telemetry.
Turn on your transmitter and switch it to PPM mode, turn off the TX.
Turn on your transmitter while holding the programming button. Release it a few seconds later. The RED LED on the transmitter module will flash, indicating the transmitter is ready to bind the receiver.
Connect the battery to the receiver while holding the receiver’s F/S button. The LED on the receiver will flash, indicating the binding process is complete. Turn off the transmitter and receiver.
Turn on your transmitter. Connect the battery to the receiver when ORANGE LED on TX is on. The LED on the receiver will indicate the receiver is receiving commands from the transmitter. In a few seconds system is ready to work (communication is established).
Failsafe
Move the transmitter into failsafe position for all channels.
Press F/S button of the receiver. The green LED will flash twice indicating that failsafe has been set.
A Public Service Safety Announcement from EastBay RC!
Usually when I talk about RC, quads, etc, the emphasis is on how enjoyable it is and what interesting people are involved. If it looks like they're serious about learning more, or if they're going to come out fling with me, the first thing I do now is show them this picture, to let them know they're dealing with something that, if care is not taken, can hurt them very badly.
I grabbed these pics from an RCGroups thread... you can go there for lots more of the same. In almost every case it was somebody doing the first thing they're warned against: Testing and building with live props.
I don't want you to be scared off by these pics, but I do hope they scare you enough to follow the basic rule: If you're fiddling with your quad, disconnect your ESCs or remove your blades. And if you don't, be sure and post the results as a warning to others!
My own experiences that have make me very fanatical about this:
While measuring the power on a small (blue wonder powered, 8x6 props) quad, I reached across the blades to adjust the wattmeter, and grazed against the edge of the blades. This resulted in more of a scratch -- no real bleeding -- but it made me not want to get any closer ever again.
When at a conference, I was helping another very experienced quad builder; one of the designers of the Ardupilot Mega, in fact. I was somewhat uneasy, because he had the blades attached, but disarmed. Since he was so experienced, I rationalized to myself that it was OK. When he reset his unit, one of the ESCs provided full power for a brief instant, flipping the quad in my direction. It grazed my cheek (yikes!) and gave me three relatively small cuts (nothing like those above!) on my hand.
So, I kicked myself for having ignored what I knew was best, and promised myself to never make an exception in the future -- safe working, or I'll be happy to stand back and watch.
Another thing that's worrisome: With the advent of little helis such as the Syma 107, people are much more likely to have been in close proximity to a small flying craft. Getting hit by one of these will sting and perhaps leave a scratch, but definitely won't do the damage depicted above. In addition, people will pay you the awesome compliment of assuming you're in complete control of your aircraft with millimeter precision and millisecond timing.
So, to summarize:
There's a reason they're called Blades.
Unplug or remove your props when working on your unit.
Make a habit of disarming your unit.
Don't fly close to people, especially those who don't know the potential hazards.
BTW, this picture is from my recent drone presentation, filled with lots of interesting technical bits and more cheerful shots like these!
It looks like going this route is simpler, just need to remove the old module and antenna, and snap the new module in. The 9x is compatible with the JR module, not the Futaba.
There's a bunch of confusing bits about telemetry. (Update: which can safely be ignored asFrSky has discontinued all non-telemetry Tx)
Transmitters
V* series are one-way (no telemetry) -- discontinued, FrSky only making telemetry-enabled transmitter modules now.
D* series are two-way (telemetry).
Receivers
D4FR: voltage only
D6FR: two external AD inputs. you can use one with a voltage divider for pack voltage
D8R: two external AD inputs, and serial port
Thanks ExplodingLemur for this great information!
Repackaging the original 9x radio.
Azure Engineering has a nice way of doing this. The end result is that the 9x is now a pluggable module like the (non-DIY) FrSky module.
Other bits:
Looking also for some definitive information pages on all the above. Somebody tell FrSky they should get a web page!
Have you ever worried that people might take you too literally? When I tossed off the EastBay C tagline ("come fly with Mark in the lovely San Francisco East Bay") this is certainly not what I was thinking!
I went out with Andreas today... he had figured out the problem he was having with his FPV receiver -- a bad connection on the ground station -- and had everything ready for trying out out FPV + ArduPilot.
First, the good news... APM + FPV is a great success. Fly-By-Wire mode perfectly controls the plane while flying FPV -- smooth turns, no problems with oversteering etc. And if you ever get disoriented, a simpe flick of the switch puts the plane into loiter mode while you get things figured out. It's also great for switching pilots... pop into loiter mode, swap the video, and take up where the first pilot left off.
Things were going great, when suddenly the receiver lost connection; being in fly-by-wire mode, the Zii was content to continue flying the direction it was headed -- North, towards Marin County. Andreas headed after it, with me following behind. He ran towards the north part of Chavez Park, and found a lady who had seen the Zii fly by. In fact, she had seen the Zii land in the water. Here's the view, facing north; Point Richmond is in the background. It's sort of visible in this picture here. Andreas was not in a cheerful mood at this time... when I pulled out my phone to document things, he sort of groaned, "do you have to be taking pictures of this?"
We sat and watched the Zii in the water for a while... the wind was blowing back to us, and it looked like the plane was getting closer. Unfortunately, the tide was moving to the west... the plane got closer to us, and then started moving away, floating towards the southwest. We weren't sure if it was floating towards San Francisco, or if it would veer out to the Pacific under the Golden Gate bridge. I snapped this picture as the first Zii framed by the Golden Gate. Trappy, I hope you're impressed!
There were a couple of sailboats around, and I thought we might be able to get one of them to come to the rescue. Unfortunately, they were a bit too far out to communicate with. But that gave Andreas an idea... he had a friend with a boat that sailed out of the Berkeley Marina. He pulled out his phone, and made a call. Miraculously, the friend was driving over the Richmond Bridge... he would turn around, and be there within 30 minutes to launch a water rescue.
Traffic was good, the boat was launched quickly, and it came up the west side of the Bay. Andreas saw the boat, and pointed out the Zii. It's just where his hand is. We passed the time speculating about which pieces of the plane could be recovered.
Time between initial distress call and rescue, 27.5 minutes. Hooray Captain Tim! And our friend Jim who had come out with us did a great job of making sure all the gear didn't walk away. Hooray Jim!
Here's the recovered Zii. The plane is in perfect condition -- nice job, RiteWing! The GoPro was fine as well. Wiping off some water, it was still powered on and running well. Too bad we didn't have it recording all that time!
RiteWing flyers, the choice of amphibious flying professionals everywhere!
Electronics: The battery, APM 1, receiver, servos, and motor seem to have survived. The battery compartment wasn't filled with water... the Zii must have landed smoothly and stayed flat the entire time.
The GPS, XBee, and video transmitter were lost... it looked like there was a current active on these devices, and the brackish or salt water caused the power pads on the board to corrode away.
Here's the last logged location, at the northwest tip of Chavez Park, and heading north. Strange, that as soon as it went over water it seemed to lose power and stop logging. Is the City of Berkeley running some nefarious experiment here, perhaps left over from the 1960's? Will Chavez Park suddenly disappear in time?
Lessons learned
Fly with a transmitter/receiver that has a Failsafe. Ironically, Andreas' Christmas present was a FrSky Tx/Rx, still on its way from HK.
Fly with the GoPro in the hard case. This is only incidentally from landing in the water (hey, it survived that fine!) but from taking a tumble in a landing previously.
If the plane loses connection, try and recall it immediately via the ground control station. Andreas was downfield when connection was lost. I was at the GCS, but didn't know that the connection was lost until I went to check with Andreas.
It might be worthwhile to investigate a method for waterproofing onboard electronics.
Always turn your GoPro on, even if you don't plan on an "interesting" flight!
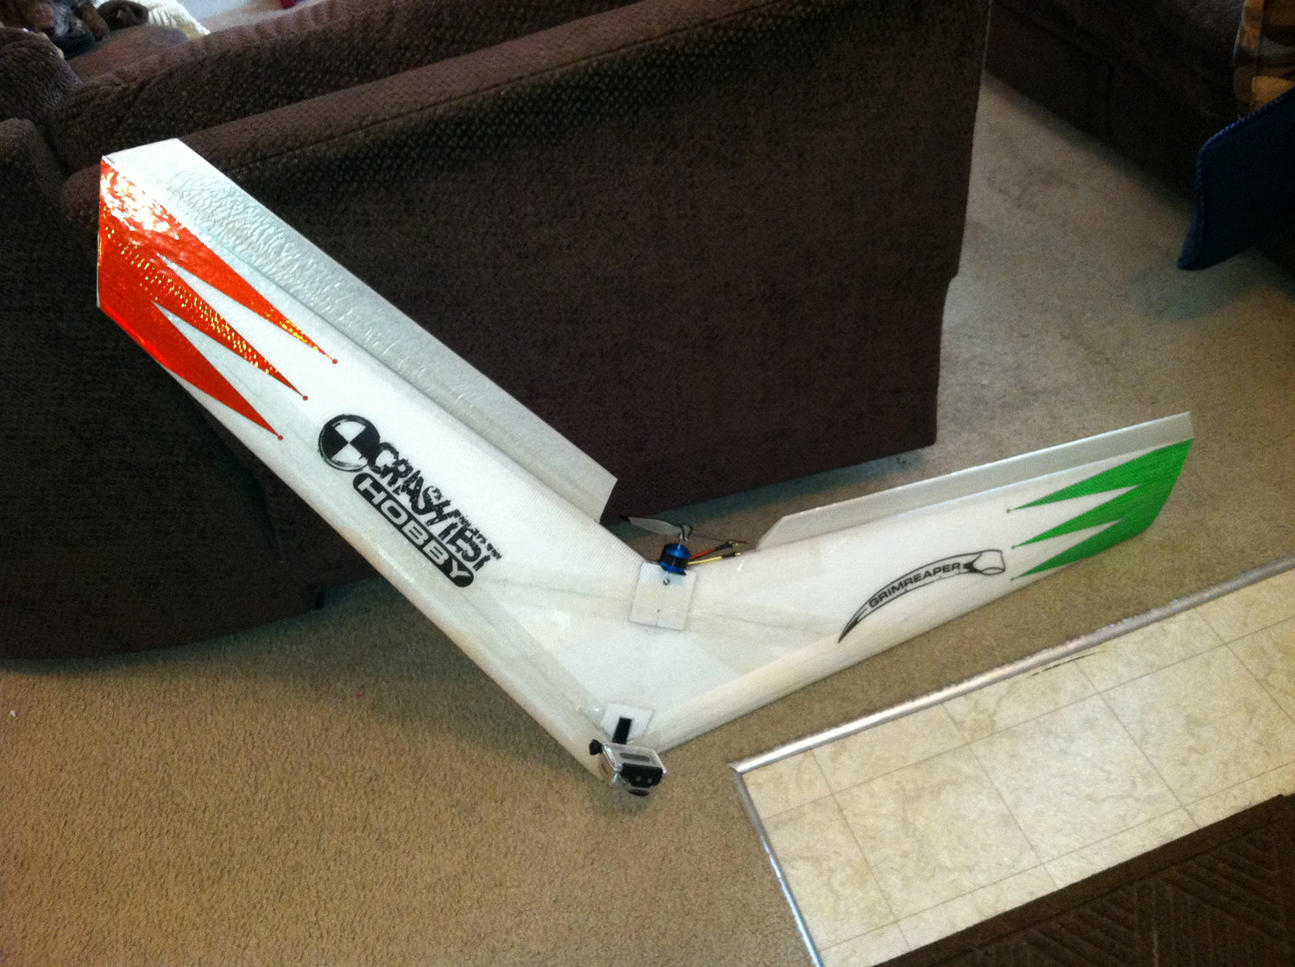
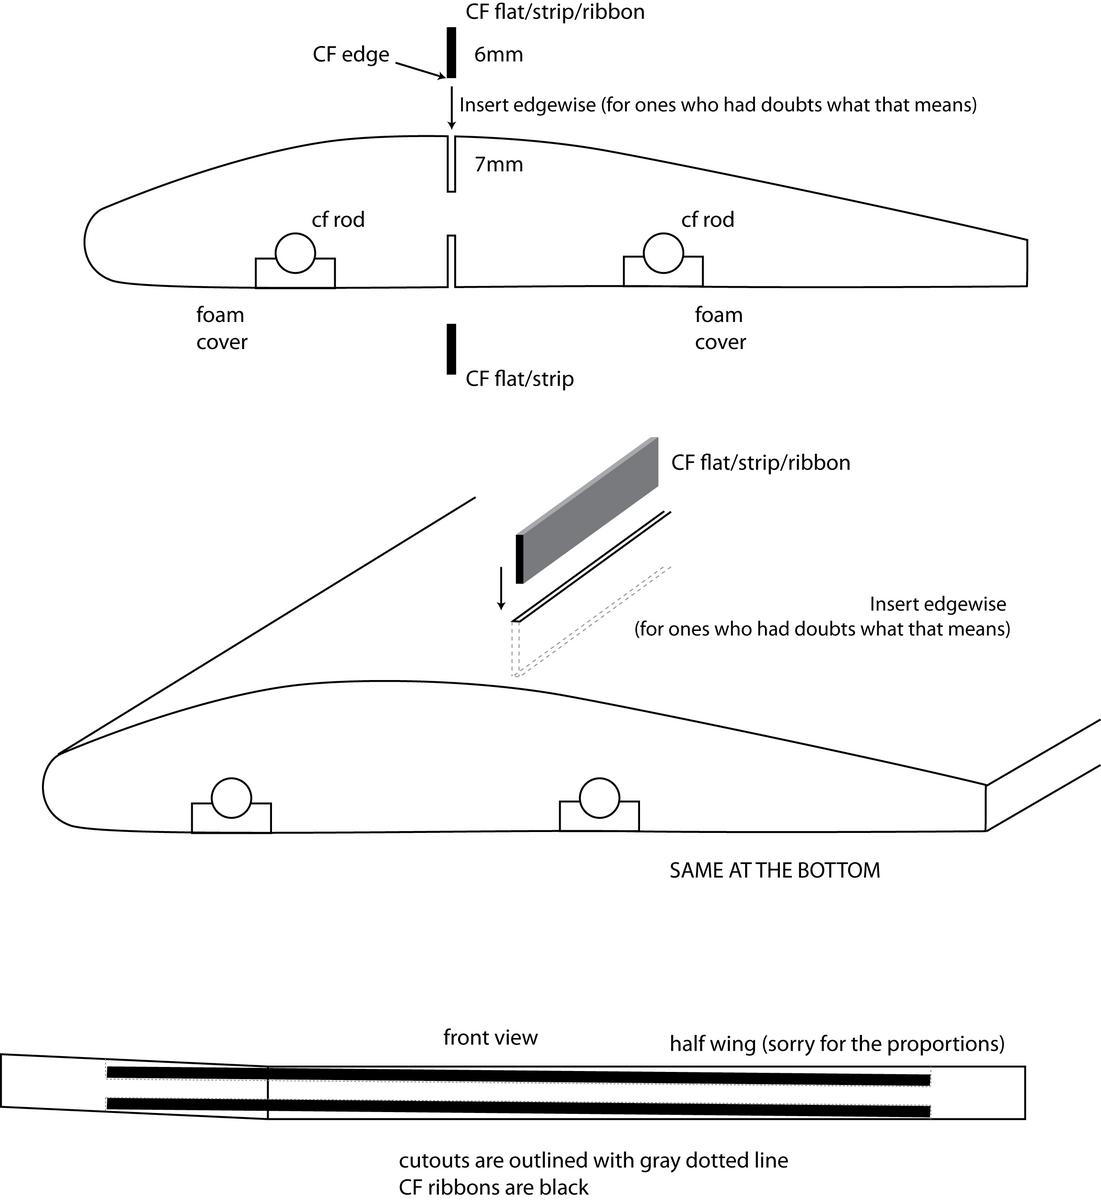
daemon has the simplest, most comprehensive Skywalker bracing setup, proven out by lots of serious (and beautiful) FPV flying. It's all in the Skywalker thread, I'm just collecting it here so it's in one convenient place.
All verbiage following collected from his postings, lightly edited by me:
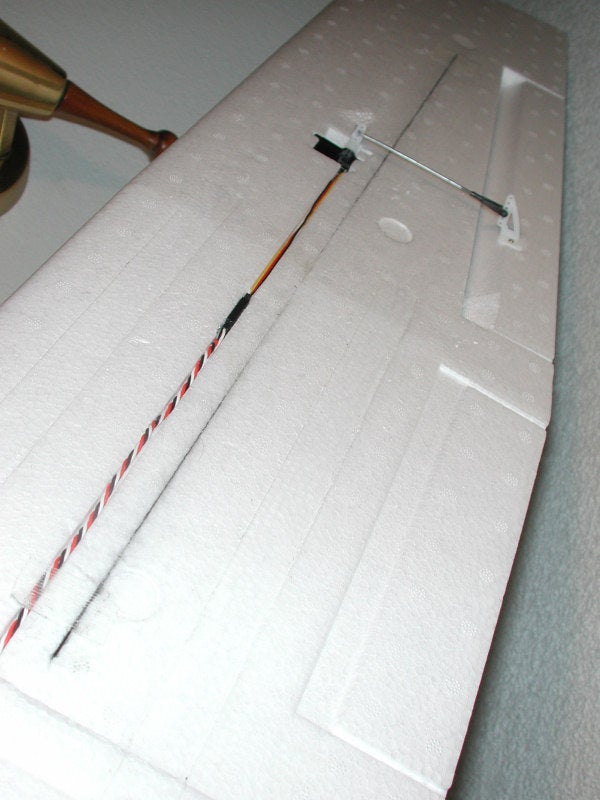
(.8 x 6mm, 36'' ribbon top and bottom)I use a long straight edge and X-acto blade to cut the slot using my finger on the side of the blade as a depth gauge (something you can't do with a soldering iron tip) and then expand the slot slightly with the tip of a screwdriver.
Turns out it's better to install it edgewise in the foam rather than lay it flat because then each ribbon has full bond to the foam on both sides and is less likely to buckle under a compression load. I've been doing this for many years on all manner of foam planes (long before FPV) and have load tested the technique extensively. It's also quicker and easier to install edgewise, and easier to avoid screwing up the airfoil. Note also, that when you lay it flat on the SW's wing with its dihedral break, you're building a bend into the ribbon which effectively pre-buckles it, and that becomes the focal point of all compression and tension forces. When I install edgewise across the dihedral break, on top of wing I make the slot deeper at the ends and on bottom of wing deeper in the middle than the ends. The two ribbons are thus installed perfectly straight, so have no inherent weak point.
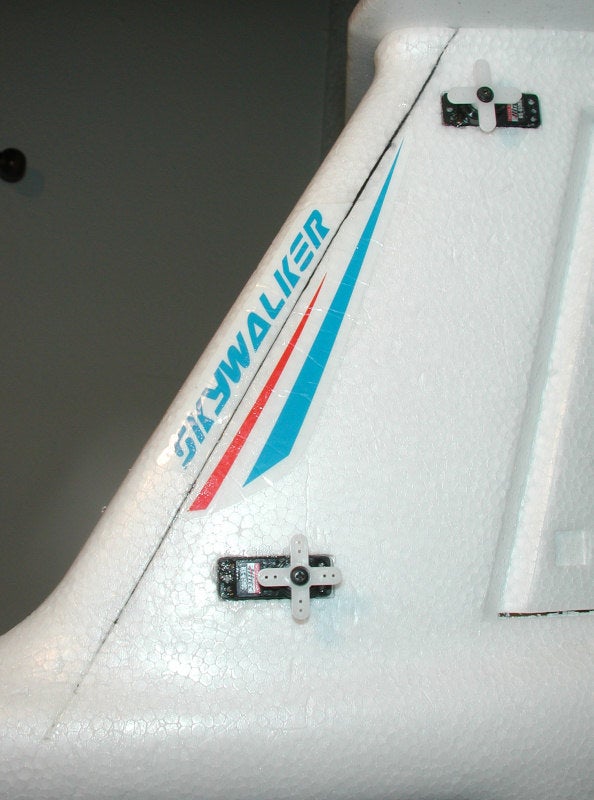
(0.7 x 4mm carbon strips)To stabilize the horizontal stab and maximize the stiffness of the vertical, the ribbons should be embedded edgewise into the outter surfaces and run all the way from the very top of the saddle that the horizontal stab mounts to, down into the heart of the boom. Mounting em opposite like this creates a virtual I-beam. Running em up to the top of the saddle stabilizes the foam in the saddle itself which keeps the horizontal stab from rocking back and forth (eliminating the need for external struts). Running them down into the boom, reduces the bend and twist of the vertical relative to the boom itself.
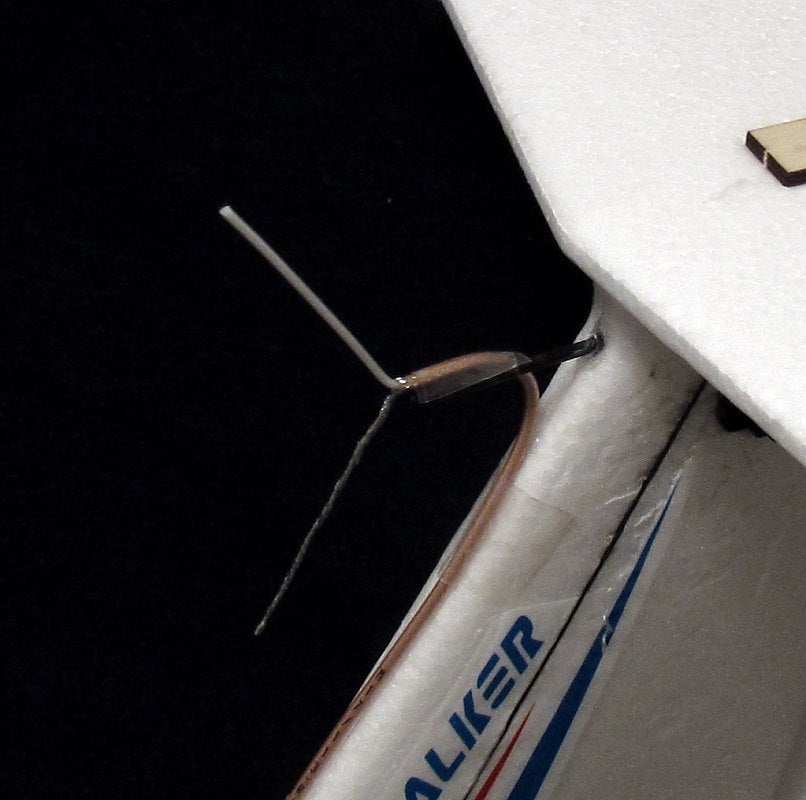
My Vee antenna is mounted a couple inches in front of that (on it's own carbon rod, no less), and I've been out 6 miles with it. So no, the carbon has no measurable effect on video Tx.
RCGroups user pajonate contributed this illustration.
They are available in the following sizes: 8x4.5, 9x4.7, 10x4.5, 11x4.7 and 12x4.5. There are two different plactic formulations used for these props. The standard ones are made with a fiberglass filled ABS plastic, and are about the same stiffness as an APC Slow-Fly type prop. These are available in Black, Bright Green and Bright Orange in both normal and reverse rotation.
The Hi-Strength versions are made from a carbon fiber filled nylon, and are about 10 times stiffer than the standard props so they really maintain their shape and airfoil under load. These props are only available in black, and have a satin finish to them. Prices on the props are as follows, normal or reverse pitch is the same price:
Standard Series, Black, Green or Orange: 8x4.5 - $1.50 each 9x4.7 - $1.75 each 10x4.5 - $2.00 each
Carbon Reinforced Series, Black: 8x4.5 - $2.00 each 9x4.7 - $2.25 each 10x4.5 - $2.50 each 11x4.7 - $3.00 each 12x4.5 - $3.50 each
Getting ready to teach an Arduino class, so have a lot of links prepping for that. Instead of giving the impression that this blog has forgotten about flying, I'm posting a bunch of miscellania here.
Timer Stuff
timer1 library. This library is a collection of routines for configuring the 16 bit hardware timer called Timer1 on the ATmega168/328. There are 3 hardware timers available on the chip, and they can be configured in a variety of ways to achieve different functionality.
For good 3D you should have at least +- 45 degrees.
Cut slits only if you have stiff hinges. If they are already flexible the slits won't help.
The longer arms are pretty typical, especially for the 5 gram servos.
Possibly increase the servo travel if your Tx allows. Most computer radios allow you to do this in the "travel adjustment" and also in the "dual rate/expo" set up.
For me, more throw means I use more expo for nice control response.
Basic idea: attach mirror to the quad arm, shine a laser beam reflected onto a wall. Vibrations show up as a line, when the reflected later light is a point you're perfectly balanced. Very clever!


.jpg)