Saturday, August 10, 2024

ESP32 Serial Driver for MacOS

It is here, under the Drivers tab:

https://www.silabs.com/developers/usb-to-uart-bridge-vcp-drivers

There is an installer and uninstaller.

When you install, you will probably get a security warning and have to allow it in System Settings.

Saturday, July 13, 2024

FRIA ("FAA-Recognized Identification Areas") Info and Map

https://www.faa.gov/uas/getting_started/remote_id/fria

 https://faa.maps.arcgis.com/apps/webappviewer/index.html?id=8f274117010f4eb1a50f64c1719be12b


Thursday, July 11, 2024

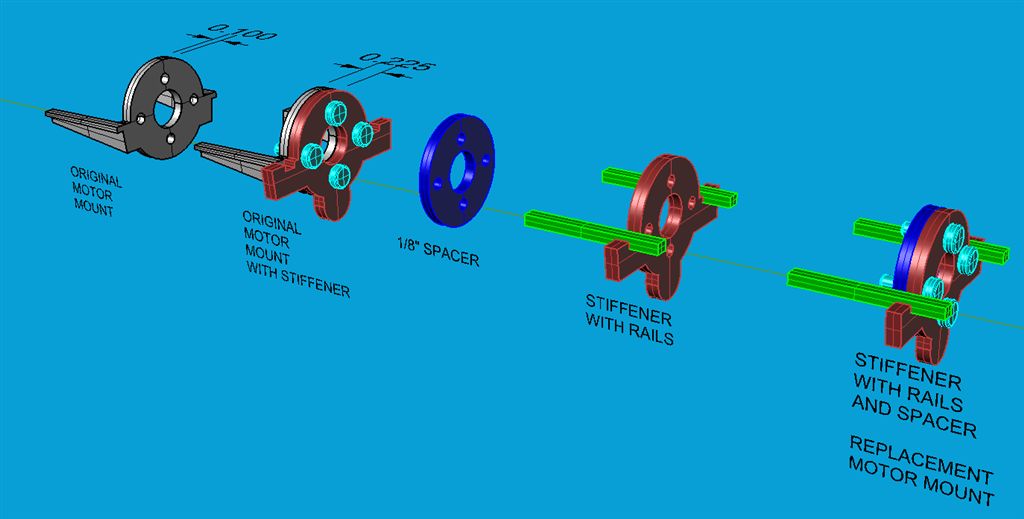
UMX Ultrix Replacement Motors

Information and photos courtesy of AirDOGGe @ RCGroups here.

  • Eachine / HappyMotor EX1102 13500KV 1.5mm
  • Gemfan Props 65mm-2 1.5mm


Monday, June 3, 2024

Realflight Channel Information

Courtesy of flightengr at Realflight Forums:

Most models follow some standard conventions.

All helis have a Throttle Hold feature on RealFlight Channel 9. You need to release that hold in order to make the heli responsive to the throttle.

Planes generally have:

flaps on RealFlight Channel 6 - Flaps, the landing gear on RealFlight Channel 7 - Smoke, and either SAFE Panic Mode or Thrust Reverse on RealFlight Channel 12. Both planes and helis equipped with SAFE flight modes use RealFlight Channel 8 to change modes.

You don't mention which controller you're using. If you're using the InterLink DX controller, here's where you'll find those functions:

Switch A - RF Channel 7  - Smoke and landing gear
Switch B - RF Channel 8  - Mode
Switch C - RF Channel 5  - Elevator Dual Rate
                          (or Dual Rate for all of Ail/Ele/Rud
                           when only one switch is used by the model)
Switch D - RF Channel 6  - Flaps
Switch H - RF Channel 9  - Throttle Hold (for helis)
Switch F - RF Channel 10 - Aileron Dual Rate
Switch G - RF Channel 11 - Rudder Dual Rate
Button I - RF Channel 12 - SAFE Panic or Thrust Reverse
                          (depends if the model has either of these features)

If you're using your own radio as a controller, you'll have to map your radio's channels to the RealFlight Channels using the Controller Profile.

Monday, December 28, 2020

Eachine E130 Helicopter

 Eachine e130 2.4g 4ch 6-axis gyro altitude hold flybarless rc helicopter rtf Sale - Banggood.com

  • Flybarless, no collective pitch.
  • The printed manual seems to disagree with some of the online specs.
  • Protocol: DSMX DSM2 PPM "S-SUS".
  • Battery: 2S 700mAh 20C, JST.
  • Hover Switch? "It's for trimming up the helicopter. The controller will not remember trim settings between flights unless you use this button. To trim, first press the hover button for 5 seconds until the controller beeps, and its power light starts flashing. Then launch the helicopter, and be prepared to counter any uncommanded drift with the pitch roll stick. If you notice drifting, repeatedly press a corresponding trim button to negate that lift (those little buttons to the left and below the pitch roll stick). For example (Mode 2 controller), if the heli is drifting left, repeatedly press the right arrow trim button located directly below the right stick until the drift stops. If drifting forward, repeatedly press the back (down) arrow trim buttoned located left of the right stick until the movement stops. Once stable hover is achieved, land the helicopter, press the hover button again until it beeps and the light goes steady. Then turn off the helicopter and controller. The controller should now remember your hover trim settings for successive flights. By the way, there's also a gyro calibration for extreme drifting. Place the helicopter on a flat level surface, then move and hold both sticks to the lower left corner until the helicopters lights blink indicating that it is calibrating. Calibration is completed once the lights go steady. see less
  • Rate Switch? "Top left button is the high/low rate button."


Monday, October 19, 2020

OpenTX Smart Throttle Cut

 Logical switches: 

L1 AND SFv L2
L2 OR L1 L3
L3 a<x Thr -96

Special Functions:

SF1 !L1 Override CH3 -100 (then tick the "ON" box) 

Mixing for Two-part Landing Gear

Mixers 


CH6    SF Weight(+100%) Delay(u2:d2) Slow(u2:d2)
CH7    L02 Weight(+100%) Delay(u4:d0) Slow(u2:d2)
CH8    MAX Weight(+30%) Switch(SB-) Slow(u4:d4)
    += MAX Weight(+60%) Switch(SB↓) Slow(u5:d5)

Logical Switches

L1    CH6 > 95
L2    SF↑ XOR L04
L3    CH6 < -95
L4    L01 OR !L05
L5    L03 OR !L04

Mixing for Axial Rolls

 Read somewhere:

Finally dialed in some aileron to elevator mix, so that there is some down elevator when ailerons (right or left) are moving.

Your results may vary, after some trial flights I have now some 35% aileron differential, and 25% aileron-elevator mix (positive for right aileron movement, negative for left aileron movement), and the Wingnetic now rolls the way it should.
 

Thursday, September 24, 2020

Drop Ctrl Configuration Notes

Config Instructions:

Software:

Some Notes

Create Config and download Bin

Running the Loader

./mdloader_mac --first --download massdrop_ctrl_config.bin --restart

Massdrop Loader 1.04
Massdrop Loader  Copyright (C) 2018  Massdrop Inc.
This program is Free Software and has ABSOLUTELY NO WARRANTY
Scanning for device for 60 seconds
......... ***** PRESS FN-B FOR 1 SECOND AND RELEASE TO REBOOT
Device port: /dev/cu.usbmodem141412201 (SAMD51J18A)
Opening port '/dev/cu.usbmodem141412201'... Success!
Found MCU: SAMD51J18A
Bootloader version: v2.20 Mar 27 2019 10:04:47 [ctrl]
Applet file: applet-flash-samd51j18a.bin
Applet Version: 1
Writing firmware... Complete!
Booting device... Success!
Closing port... Success!

    QMK Quick Notes

    # https://docs.qmk.fm/#/newbs_getting_started
    # github fork qmk_firmware

    brew install qmk/qmk/qmk
    qmk setup marhar/qmk_firmware
    cd $HOME/qmk_firmware
    qmk compile -kb massdrop/ctrl -km default
    qmk config user.keyboard=massdrop/ctrl
    qmk config user.keymap=marhar
    qmk new-keymap
    qmk compile
    qmk compile -kb massdrop/ctrl -km marhar
    vi keyboards/massdrop/ctrl/keymaps/marhar/keymap.c
    vi keyboards/massdrop/ctrl/keymaps/default/keymap.c
    $ ls $HOME/qmk_firmware/*.bin
    massdrop_ctrl_default.bin
    massdrop_ctrl_marhar.bin

    Tuesday, August 18, 2020

    Jumper R8 Notes

    RCGroups thread:

    Midelic Firmware thread:

    STM Flasher and Tutorial
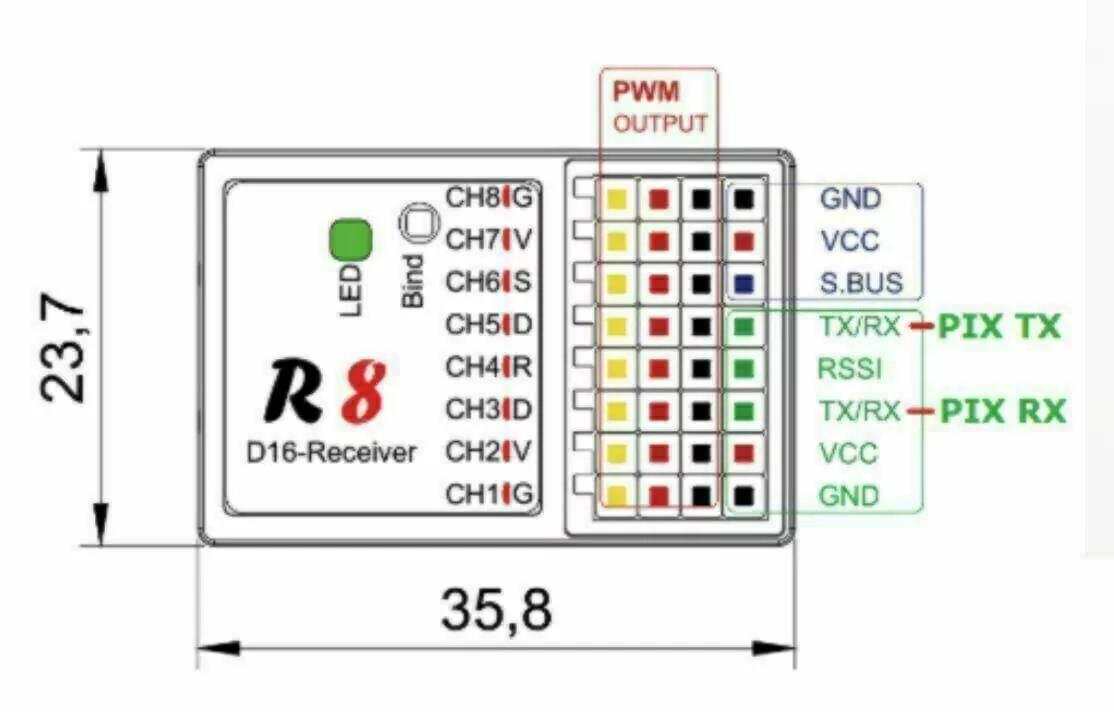
    For STM STM32CubeProg on Mac:
    Double clicking the installed app just bonces the icon in the dock once and then quits . You can get it to run by right clicking on the installed package (STM32CubeProgrammer.app), selecting 'Show package contents' and navigating to Contents/MacOs/bin/STM32CubeProgrammer and right clicking 'open'.

    CPU:
    • STM32 F103C8T6 6Q25E 1193
     LED colors

    • steady green: signal good
    • blinking green: signal bad
    • solid red: signal low
    • blinking green: signal bad
    • solid red: signal lost

    Jumper Manual R8

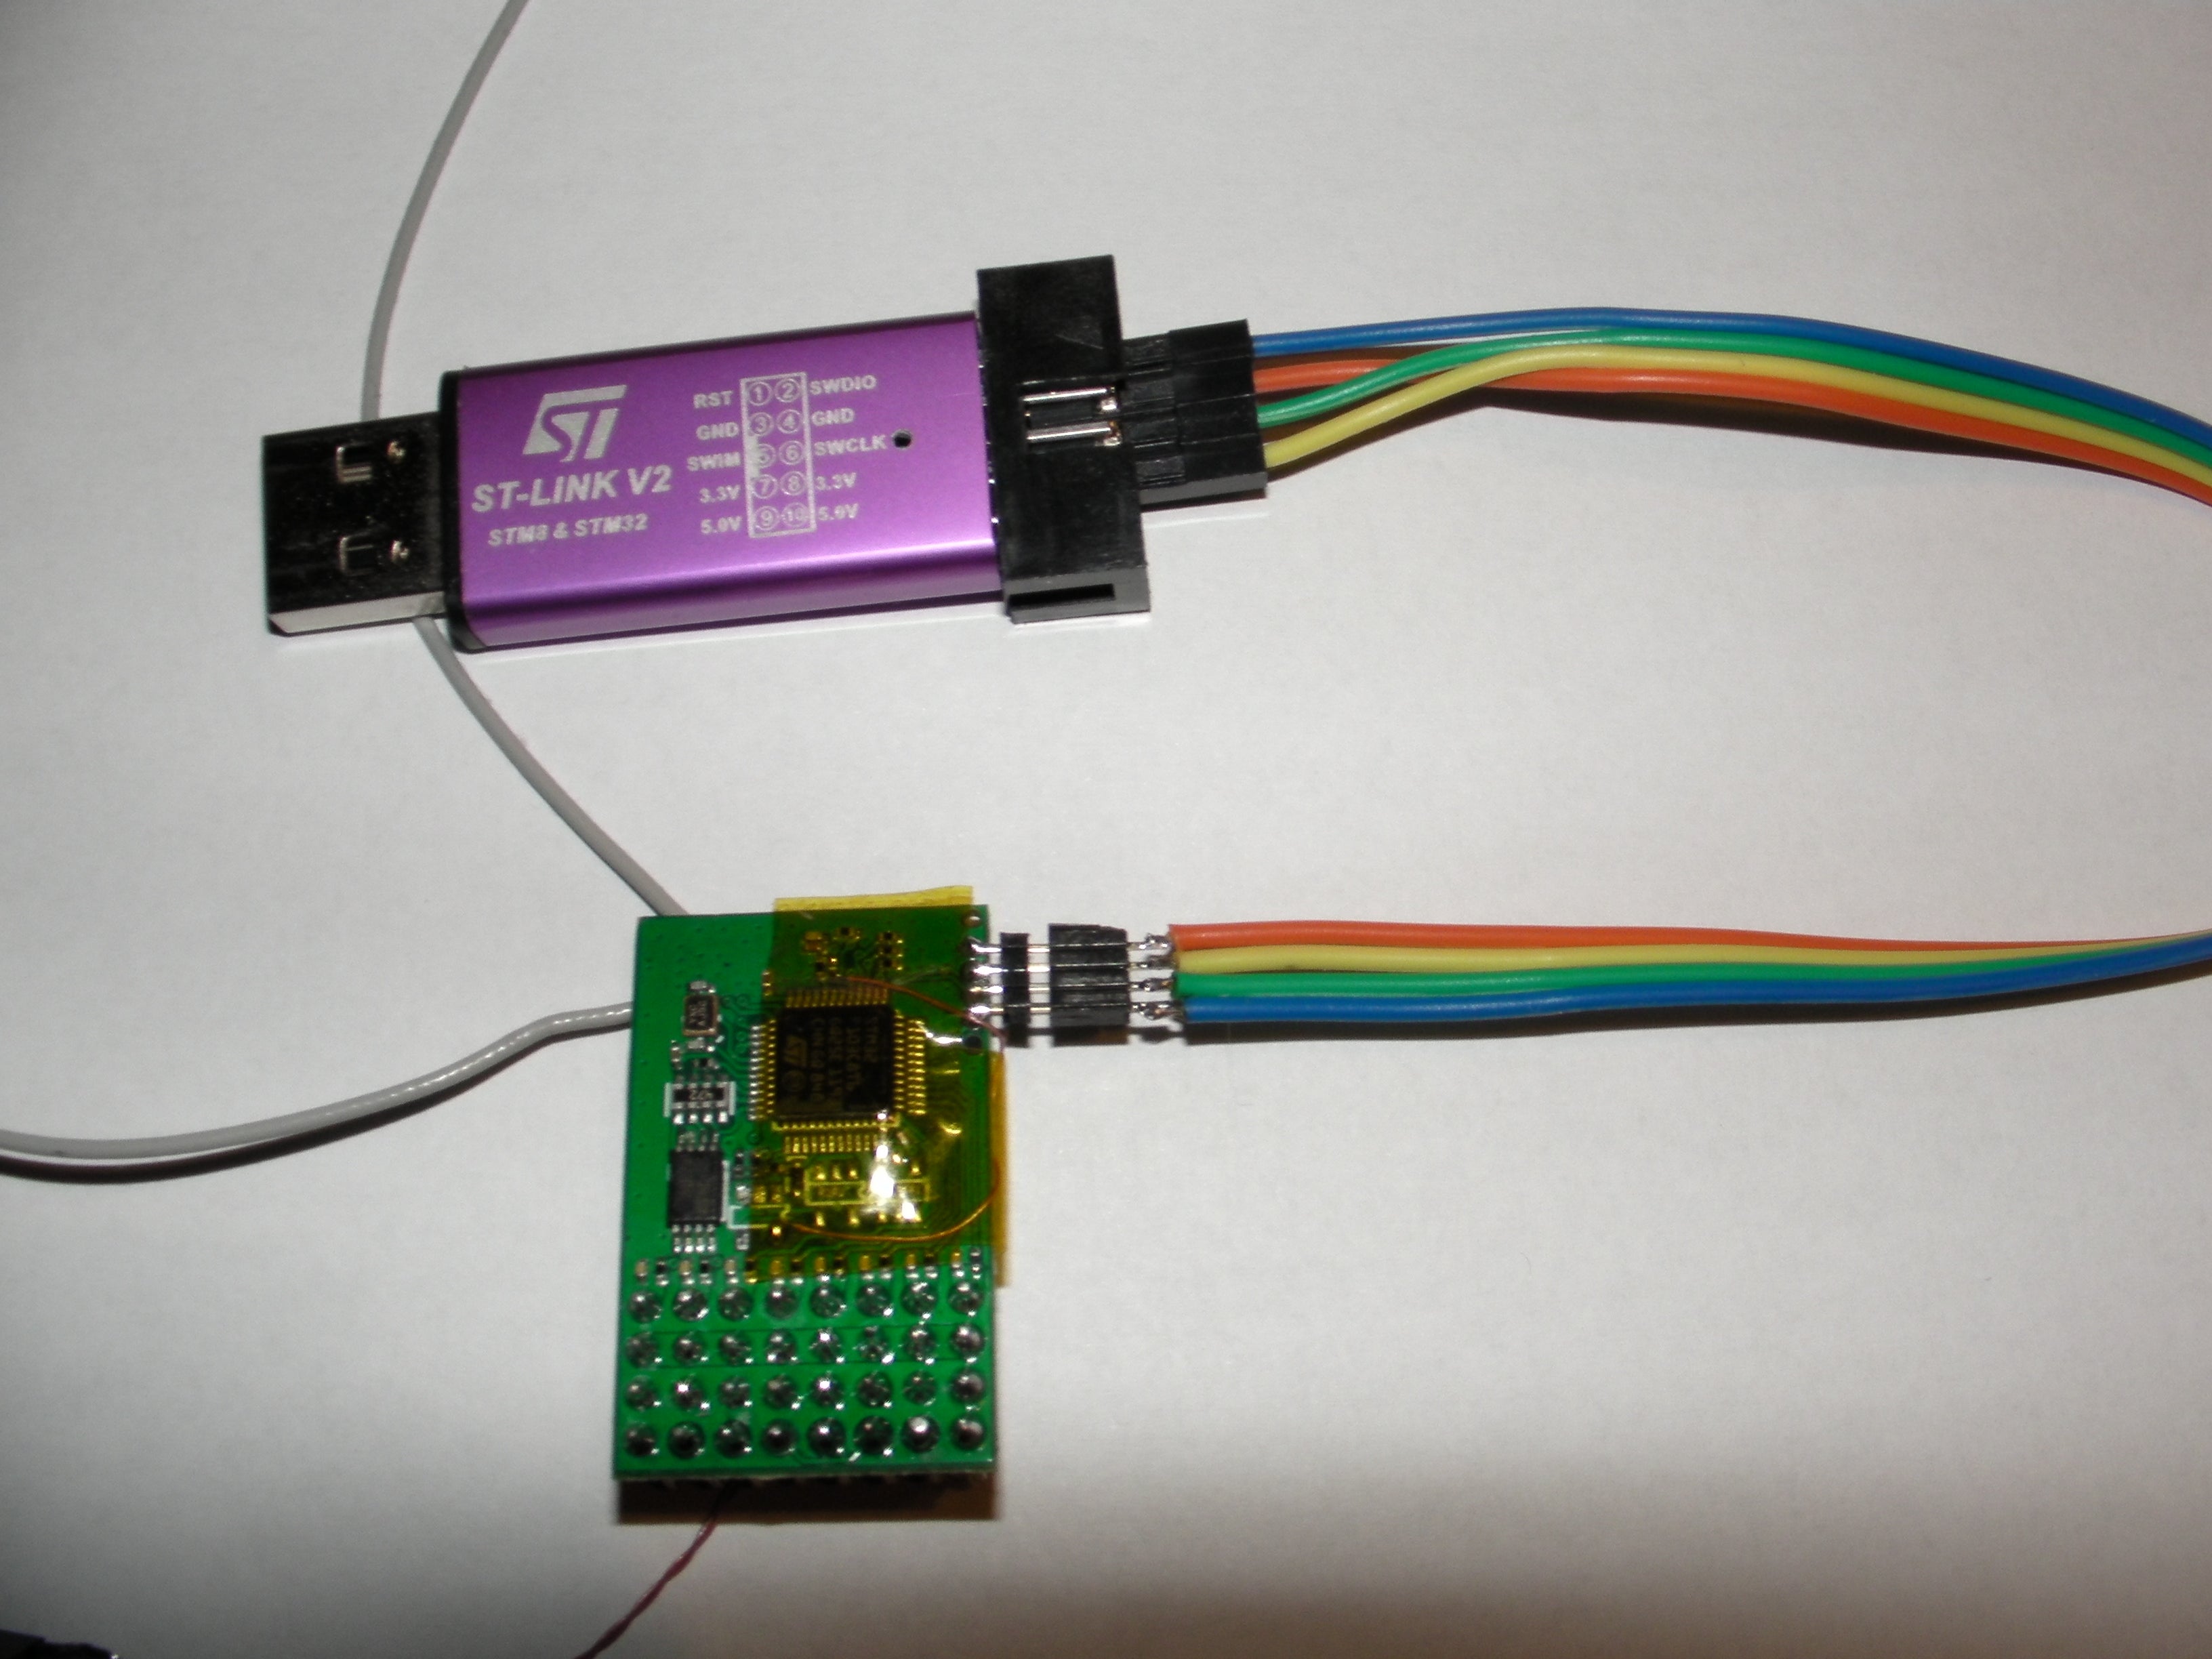
    Flashing new firmware on Jumper R8 connections.
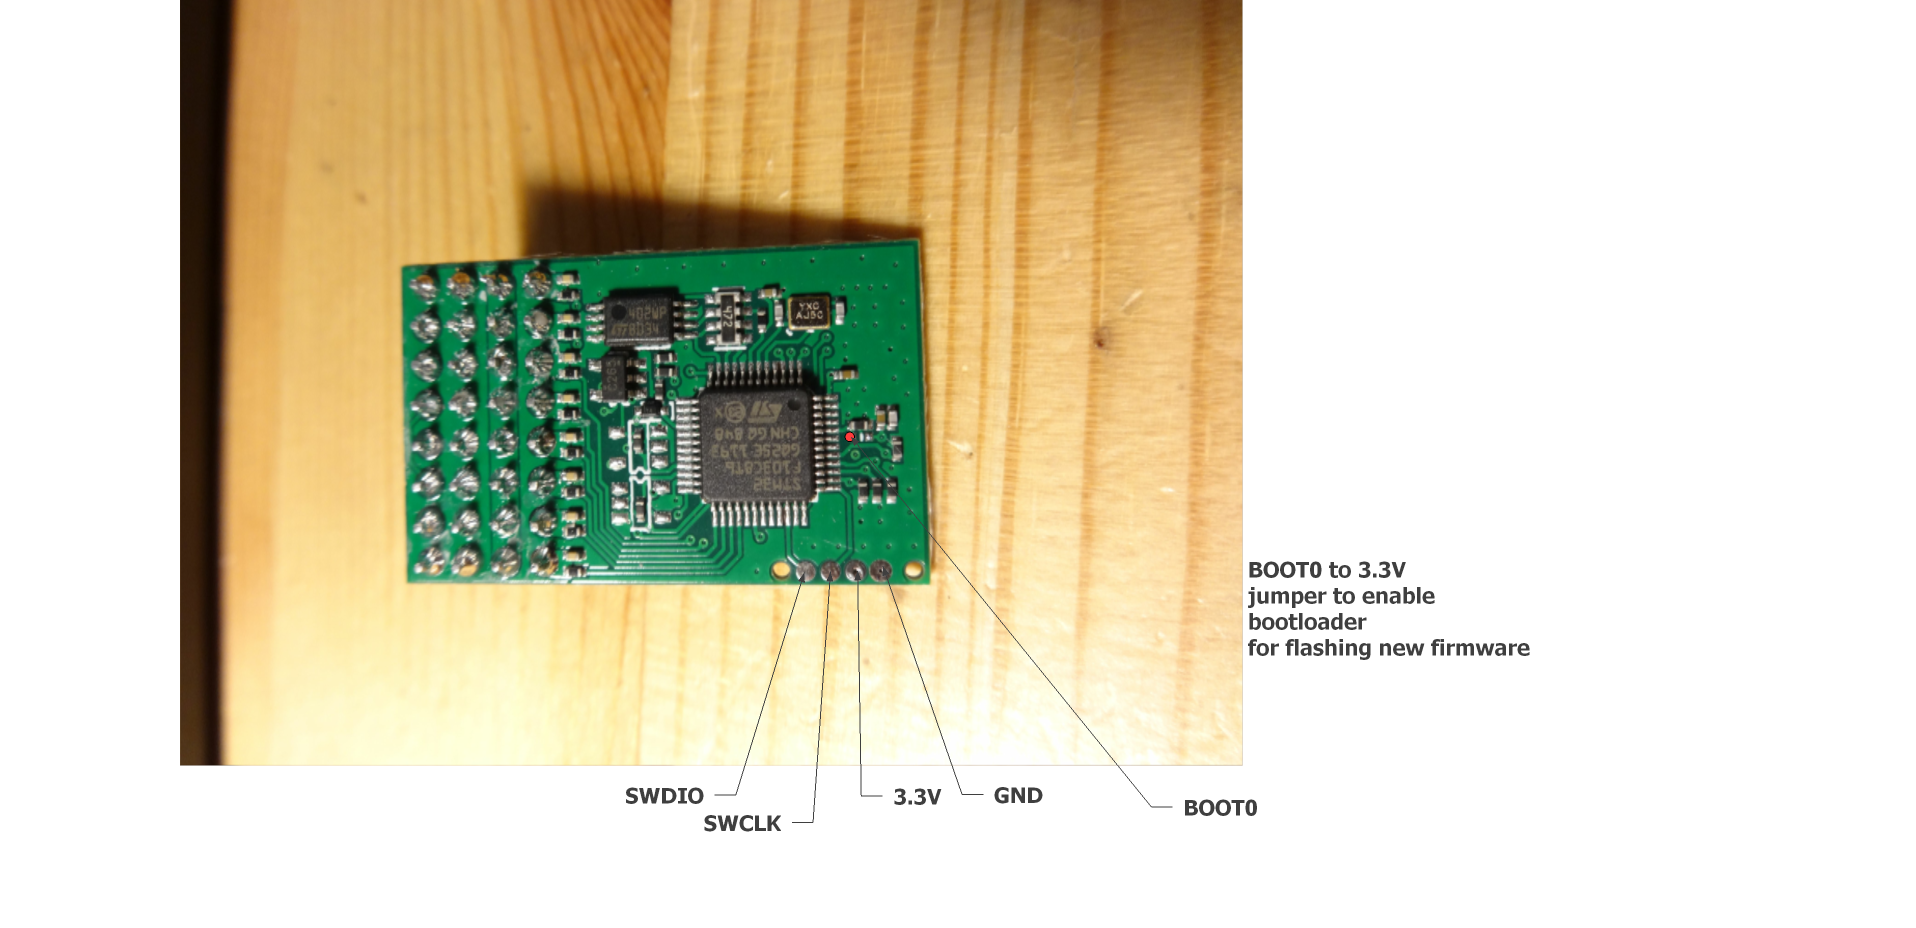
    • Use STlink V2 programmer.
    • connect STLink device ,press Target/connect.
    • If you receive "Read out protection" enabled warning, go into "Option bytes" and disable it.
    • Press "Erase/Chip" after that press "Program&verify" load the binary file to be flashed.
    a12967115-35-Jumper_R8_1.png (1916×928)a12967117-191-Jumper_R8_2.jpg (3264×2448)


    Monday, August 10, 2020

    Powered Solder Sucker Notes

     Some good tips from the Amazon page.
    • BIT/DESOL3 is the replacement tip. Look at the other answers, they say it has a 2.1mm opening.
    • This isn't made to be used like a pencil like the non-heating ones. The button is near the back! The way you hold it is (to explain in words here) by opening your (right) hand and placing it in your palm with the plunger push-down at the same side of your palm as your thumb. Wrap your hands around it. Your thumb is now right on the release button! Hold it like you are stabbing the pc board. Place perpendicular to the board, wait maybe 3 secs, then use thumb to press the button. No shifting, jerking, momentum issues, etc. Just lightly tinned holes/pads after you are done.
    • For cleaning, Seller is wrong. Very cleanable. Instructions on pkg, but there is even a better way... Look closely at the housing/base where the plunger rod goes into the black end of the yellow tube. You can see the bigger outer housing you hold has a little partition at the top of the suction tube. The yellow tube is cradled in the outer tube. Use a small flat screwdriver and lever it slightly and it pops out - the whole tube. It comes apart for cleaning. An old toothbrush cleans the plunger well. It seems to all gather at the end of the plunger. It has a light coating of grease, probably silicone paste, so if you remove it by washing you may need to re-apply...
    • Properly tin the tip the very first time you heat it up, and treat it like a soldering iron!--ie: keep the tip wet with fresh solder while you work. *Adding* solder to a joint you want to *desolder* is a "secret" well-known by the experts because it keeps the joint fresh and flowing rather than brittle and plasticized so that the solder flows well and the joint is cleaned nicely when you press the vacuum button. Also be sure to hold the iron vertical to get good suction when sucking. And let me repeat: if you say the iron is not hot enough you are WRONG! (in 98% of the cases). What you need to do instead is *add fresh flux-core solder* to the iron tip--get it all up inside the tip even, then place the tip over your through-hole leg to desolder and now the fresh solder will flow the heat right into the joint--press the vacuum sucker button and voila! You've just cleaned that joint perfectly!

    • https://www.youtube.com/watch?v=UdGB7vD8ey0

    Monday, August 3, 2020

    HobbyKing Rarebear 620

    AKA AngleWings RareBear


    Wing Span: 620mm
    Length: 535mm
    Flying weight: 345g
    Prop: 5.5x4.5 (3pc Included)
    Motor: 2825-1950kv Brushless outrunner motor
    ESC: 20A [Upgraded True 4S]
    Servo: 3 x 8gram
    850mAh 3~4S 20C Lipoly Battery


    motor mount parts-2.jpg (1024×519)