"The launcher pipes were cut to 5ft length, 2ft wide, rear upright 1ft, front upright 2.5ft (maybe a little high - go with 2ft). The 2 holes at the back are for staking down, we use 6-7m of 8mm bungee & a cork screw type dog lead ground anchor."
EzFly Maiden today... flew quite nicely, even though there was a lot more wind that what I was expecting. COG, which had been a problem for some people on RCG, was spot-on.
Unfortunately, the hat-cam was a bit off, so a lot of the footage I took was of empty sky. Trimmed that out, and there's still enough to give a pretty good impression of how it flies. (update: when windy, 3S helps it cut through the wind a bit better.)
Bottom line: sturdy plane, easy to build, and a good flyer. Thanks to MotorHead for such a nice design! RCG thread is here.
Update: The EZFly video curse continues! I flew up at Concord, and a nice lady got some nice footage, except the entire thing was out of focus! Oh well, just squint a bit and you can see how nicely it flies.
blogodex = {"toc" : "EZFly", "idx" : ["maiden", "the fleet"]};
random stuff the internet thinks regarding the new Turnigy Tx...
Hi guys, Sorry I have not been here a lot lately. With 2 small children and some important changes coming up in H-King (ERP & HobbyKing V2) it's difficult to make time to chat with you all.
Today I was talking with the lead engineer on the project and he said that tomorrow he should have the final version of the plastics from the injection factory. Once he gets them he will begin final test fit and QC before production. He also said that mass production starts in August, but I'm not going to promise you that.
All pricing is still on track and it's still totally open source and module based.
the 9XR has an inbuilt antenna and comes with a DSMX/DSM2 module which uses the inbuilt antenna. You can also plug your own JR module in and use an external antenna. We have given the 3D files of the module antenna system to some vendors like ImmersionRC so they can make modules for the radio 433Mhz etc.
Posted: 11 Apr 2012 at 10:35pm The 9XR is designed and built completely in-house (my back pocket reminds me of this every day). It will use the atmega chip and can be flashed with your existing customised software. In fact, it comes standard with a similar rom to one you have mentioned.
We wont be sending out eval units because we have done alot of testing in house already and its unfair to make customers wait for further evaluations.
Anthony.
Posted: 12 Apr 2012 at 9:38pm Quote: How many channels Anthony, and will it hold genuine CE certification? All our CE certs are genuine from Genuine testing companies. Unfortunately competitors like to contest those certs by retesting and making comments to undermine their legitimacy.
Just to keep the critics quiet we will be using TUV to test.
Posted: 13 Apr 2012 at 6:02pm The 9XR has a pin-out in the battery compartment for easier flashing without needing to unscrew the case. We are taking care of the customers that like to fiddle, don't worry about that.
Posted: 15 Apr 2012 at 12:30am Want a 433 LR module for the new 9XR? You're going to be a happy chappy.....
Posted: 15 Apr 2012 at 12:37am Backlight is standard Has inbuilt and module based antenna system Button config makes sense Spare parts avail from the start Switch and pot quality far better than previous version.
Posted: 15 Apr 2012 at 10:21am The 9XR will be $50.00 and targeted at the standard user that likes flying, not fiddling with his radio or looking for a shady spot to see his LCD. I like that radio and we're working on something similar (android based) but it wont have the takeup that the 9XR does.
I think Futaba, JR and Spektrum are about to get a hard kick in the nuts
Posted: 15 Apr 2012 at 11:17am Quote: Would be good if you could make them already flashed with the frsky 2.4 telementry already installed We're working with them on a module for the 9XR.
Posted: Today at 10:56am I saw T2 plastics today, they looked good but work was still needed. I would say we're 3 months out from release. (A GUESS!)
Scott Edelman scanned this interesting graphic from a 1917 articleWhen We All Take to the Air: Post-War Propositions for Commercial Aeronautics. Favorite prediction: “there may be a revival of smuggling.” Interesting commentary by Scott, check it out!
Somebody asked "what's a Trappy?" Answers here, here, and especially here.
Trappy posted a nice note congratulating Andreas. Just another reason we're both such big fans!
Hmmm, it looks like TBS lost a challenge. We put a bet out that it's not possible to build a frame from scratch within 1 hour (from zero to flying). Andreas Oesterer rose to the challenge and looks like he had 10 minutes to spare! Congratulations, the free TBS DISCOVERY shall be in the mail soon!
Any TBS DISCOVERY builders out there that can help us regain our confidence levels? Can we do it in half the time? The sheep has been served ... but we shall rise from the ashes :) The NAZA RTF sets will ship very soon, with this it should be possible in half the time!
(end updates)
So following an interesting discussion on Facebook, Trappy made Andreas an interesting offer: If Andreas could build one of his signature wooden quads from scratch to flying, Trappy would send Andreas one of his nifty new TBS DISCOVERY frames.
Here's the result!
tl;dr: finished build in 49 minutes, in the air in 51 minutes. Watch the videos at the end to see the entire build; The pictures below show some details of the finished quad.
Arm 4, which rotates clockwise. The ESC is on the side. The wood is 3/4 inch Fir.
The prop spinners are nice feet when you've got the quad upside down. Two bolts are plenty strong to hold the motor securely.
APC props are sturdy and well balanced. Andreas manfully used needle-nose pliers to tighten his spinners. You can use a small screwdriver if you like.
The APM sits on top of a piece of foam recycled from a box holding a piece of electronics equipment. It's cut to the approximate size of the autopilot.
Foam pad attached to the top plate with hot glue.
The autopilot is attached to the foam pad with bamboo skewers. Coat the top of the skewer with hot glue, and then stick the skewer through the hole. When the glue sets, snip the skewer to a convenient length. The hot glue holds the autopilot onto the skewer; the skewer sticks into the foam and keeps its position. The velcro strip holds the autopilot onto the top plate.
Here's the power distribution spider. It's based on this design and uses Wago connectors to connect the wires.
Here's a closeup at another angle.
The battery carrier is coated with some hot glue. The hot glue is less slippery than the bare wood, and keeps the battery stable in the mount. Use the high heat setting.
The top plate is used to make a flat surface for the autopilot and other things on the top of the quad. You could skip the top plate if you cut some divots in your autopilot foam pad so it's not skewed by the bolt heads. The wood for the plates is 5mm ply.
Andreas didn't do it for this video, but it's a good idea to put a helmet of some sort over the autopilot.
If you want to, you can tidy up the wiring by drilling some extra holes and running the wires through the inside of the body.
Here's the videos. First is a time lapse, and then the build. I edited it a bit to get the time down to about 45 minutes. If you've seen one arm drilled, you've seem them all drilled!
I carry the drones in a Pelican case, which is checked luggage
I enclose a note in the case explaining what they are, for the TSA to read. I use phrases like "robots for a competition" rather than use the word "drones".
I carry the LiPos in my carry-on luggage, in a bag that clearly marks them as batteries.
And a document with guidelines for travelling with batteries.
king pretty good! I went out with Andreas who had downloaded 2.6 onto his heavy lifter hex.
There's been a lot of discussion about Turnigy 9x failsafe. The solution is simple, in both Andreas' and my opinion: swap out the module for FrSky... cheap too, at $40 for the module and Rx. I'll cover setting the failsafe in an upcoming post.
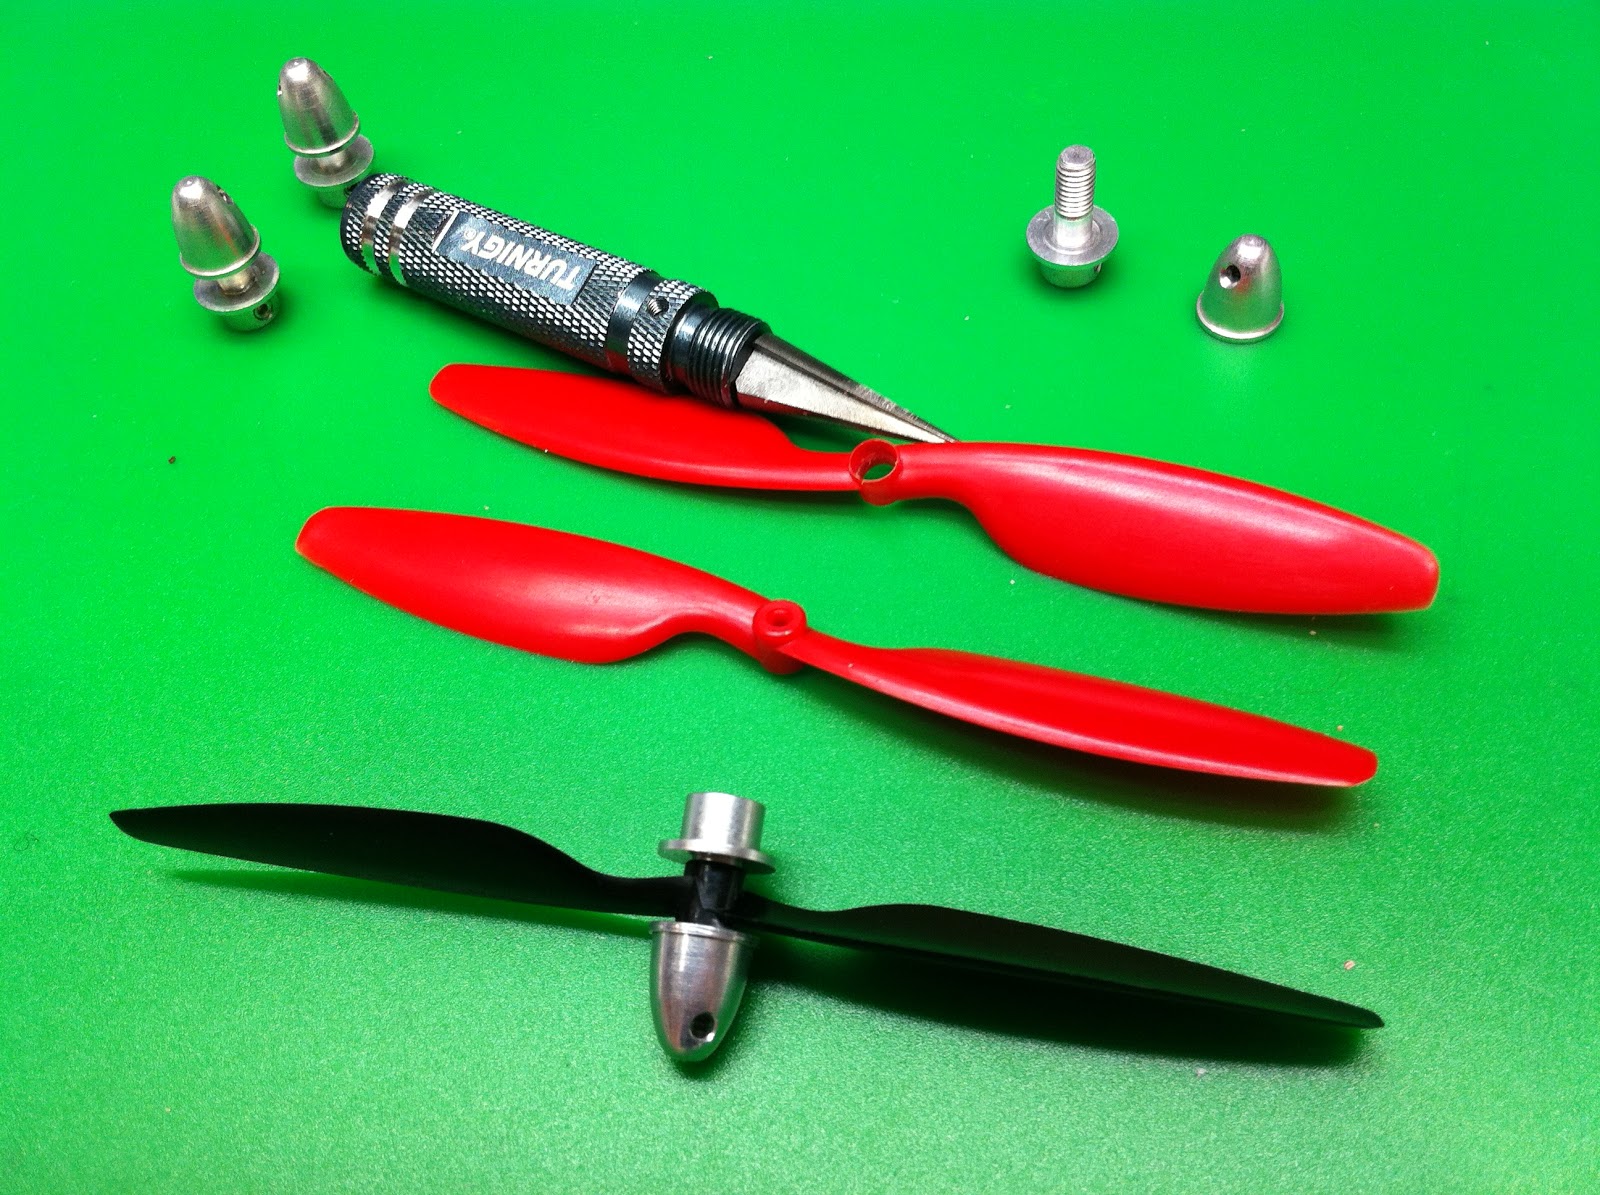
I thought I had solved the prop mounting problems by using the prop savers and the semi-drilled out props, but I couldn't get the props balanced and there was a lot of vibration. So I ordered a prop reamer to see if I could get the prop onto the collet adaptor.
It turns out you can ream the hole to be just big enough, but you have to be pretty careful.
Here's the before and after pictures.
It's reamed almost to the limit. Just a tiny bit over and it cracked through the side. It would be wonderful if HK would sell some props matched to the size of their prop shafts!
Update: the collet works a lot better than the prop saver. The only downside is that if you come close to anything your props will break in half at the thinned point. If anybody knows of a prop of this size with a thicker shaft hole please let me know!
Here's some notes I posted on rcgroups about DX6i mixing. The goal is to mix the throttle to the elevator, so that increasing the throttle doesn't make the plane rise.
MIX1 and MIX2 are "free mixers" that can mix any two channels together
pick THRO as the master and ELEV as the slave
the THRO has two things that can be mixed: D and U. D for when the throttle is between 0%-50%, and U for when the throttle is between 50%-100%. (This makes more intuitive sense if you think of the rudder -- you might need some correction when turning right but not left).
set the switch to SW = ON. This makes the mix always active. You can bind to one of the switches if you want to turn it on and off.
pick some small values: 0% for D and -10% for U (negative percent = down)
take off, and get some altitude.
give lots of throttle. you should see it rise like you are used to, but a little less
the ELEV mix is proportional to the THRO
play with the two percentages until it's how you like it
be careful and don't do too much at the beginning. If you mixed -100%, you would go right into the ground as soon as you throttled up!
Received my EasyCap USB video adapter (model DC60) from DealExtreme and gave it a try... not bad for a $9 piece of equipment. Here's some random notage:
Mac EasyCapViewer is here. It's a port of the reversed-engineered linux version. Seems to work pretty nicely. has record mode.
There seems to be a lot of variations in model numbers, features, video resolutions, etc. Not sure what they all mean, but seems to affect which drivers, etc. you need. It seems the DC60+ doesn't work on Mac at this time.
Includes a CD with ULead for windows. There's also a drivers directory which seemed to install the right things on Windows 7. I installed that but not the ULead software.
Here's the video input running through the APM Planner. I was at work so the only handy video input was my gamecube. Let's FPV through Pikman 2!
Turn the video on under Configuration/Planner. Here's the parameters I used for the shot above.
I've had a chance to try out a couple of these microquads, and the Ladybird is definitely the best. If you're a beginner, you'll be able to get it flying with no problem.
If you're in the USA, get the model with the Mode 2 Tx and it will have everything you need to take off!
Chris needed to do some prep for the upcoming SparkFun Challenge, so he asked if anybody wanted to get together for a Memorial Day fly-in. I drove up with Andreas and Charlie Burtoff; there were about 15-20(?) people all together, although I didn't actually count.
Here's a shakycam of Andreas flying the Zii, a hex, some of the flyers, and Andreas with his fine-looking FPV mask.
So Andreas saw the Flitetest video on the F22 and got the mood to cut out one for himself. He called me up and asked if I had any 9mm EPP foam. I did, and all the electronics and hardware necessary, courtesy of my prior thought to try to get the scouts to build some planes. I was thrilled to be able to put these to use, and Andreas said he would cut out an extra one for me. Here's the pieces cut out.
And now glued up. Very nice! That's an 8x4 prop on a 1500 kV blue wonder motor. 18A ESC, 500 mAH 3S batteries, 9g servos.
View from the bottom. Those are 3mm carbon tubes running laterally. Bamboo skewers on the leading edge and for the push rods.
Here's mine, ready to glue up. Using Beacon Foam-Tec, including the hinges.
And completed! Elevon flight controls following the new East Bay Elevon standard, coming up in another post.
Flight test upcoming! It will be fun to be flying something that only has two CPUs on board.
IF YOUR APM IS ON AN AIRCRAFT, DISCONNECT THE AIRCRAFT BATTERIES OR REMOVE THE PROPS!
No kidding, the props can spin up unexpectedly and send you to the hospital for stitches!
Run Arduino and configure the environment
Run the Arduino program. Restart it if it was already running so that it can see the APM USB connection.
Set the CPU type: Tools / Board / Arduino Mega 2560 (AtMega 1280 for APM1)
Set the APM serial port: Tools / Serial Port / /dev/tty.*usb* The name will vary, look for tty and usb.
Set the sketchbook location: Arduino / Preferences... / Sketchbook Location
Set it to the unzipped directory; In my case: /Users/mh/apm/ArduPlane-2.34
Quit Arduino and Restart.
Double check that the above three settings are still good.
Compile (Verify) the ArduPlane software
File / Open... and navigate to /Users/mh/apm/ArduPlane-2.34/ArduPlane
Open ArduPlane.pde. This will give you a window with several files opened in tabs.
Click the Verify button.
After a while, you should get a message like "Binary sketch size: 157,232 bytes (of a 258,048 byte maximum)"
Upload to APM
Click the Upload button.
You should see the APM serial light blink furiously
You should get the message "*******"
Working on the Arducopter software
note: There's some unorthogonality with the downloaded Arducopter zip file. There's no intermediate directory with a version number.
Grab the newest copy of ArduCopter from the ArduCopter repository. I grabbed version 2.5.5.
Unzip ArduCopter-2.5.5.zip in some scratch directory. This will give you two directories, Arducopter and libraries. libraries is identical to the ArduPlane version, so you can ignore it.
Delete the directory ArduPlane-2.34/ArduCopter
Copy ArduCopter to ArduPlane-2.34.
You should see the directory ArduPlane-2.34/ArduCopter.
In Arduino, open the file ArduPlane-2.34/ArduCopter/ArduCopter.pde.
Compile and Upload as described above!
Working with git
The Arduplane projects are hosted on Google Code. Get a Google account if you don't have one.
You don't need to grab ArduCopter separately. It will be in the ArduCopter directory as described above. If you do grab it, it will have a single file pointing you to the ArduPlane repository.
Using command line tools
There are notes in README.txt
tl;dr: cd ArduPlane; make configure; edit ../config.mk; make; make upload
I had to edit the following entry in libraries/AP_Common/Arduino.mk to add the -C parameter.
We had a nice interview with KGO San Francisco today. Flew the quad and Zii in some pretty stiff winds -- there were whitecaps on the Bay when I was leaving.
For one of the segments I put the quad in position hold behind me, and answered the interview questions while holding the radio. I was impressed with the position stability given the high wind.
Here's a snippet of the interview, drone's-eye-view:
Here's the upcoming OLED Cinemizer goggles. Close to $1,000, definitely nice looking... but too bad, they only go to +5 diopters. I shall use them as style inspiration for my homemade set!
Location Latitude Longitude Declination BERKELEY 37° 52' 18" N 122° 16' 18" W 14° 7' EAST PIEDMONT 37° 49' 28" N 122° 13' 50" W 14° 6' EAST CONCORD 37° 58' 41" N 122° 1' 48" W 14° 6' EAST
Trappy explains: "the battery bay is there to make your ZII durable. on our tests we dived in vertical from 30 meters on purpose. the forces get spread evenly and the 6mm plywood takes most of the beating, protecting the battery and the ZII. Use lots of gorilla glue when glueing it in, the glue will enter through all these tiny holes in the ZII Bay and make it really strong."
Product page here, forum discussion here. Lots of detail from Trappy, be sure and check it out!
When I started this blog, I made it a point that it would be mostly my own words. If it weren't something I was actually doing myself, I would write at least a little about whatever it was I was posting a link to.
As a result, I often have a half-dozen or more browser windows open to various interesting things, waiting to be written about. I think I'm going to start a weekly post to collect these things. I'll try doing every Thursday evening, based on the logic that I've got a few things open now and it's Thursday evening.
KapteinKuk discusses his firmware to convert a Turnigy ESC to a brushless controller. Source code included!
I received a couple of emails asking about building a quad, and how much it would cost in parts to do it yourself rather than buying a ready-to-fly model.
Here's a HobbyKing based shopping list. I think it's pretty feasible, a lot easier than building a plane since there's no moving parts. You will need some basic soldering to put connectors on the speed controller.
Executive summary: quad parts, about $230 including shipping. radio and charger, about $100.
Frame and Power Distribution. There's a lot of latitude in the frame. You can make one out of old boards and plywood for almost free. This is a popular frame and good for a first unit. The power distribution board lets you easily hook up the speed controllers to the battery.
Control Board. There are lots of options for control boards. This is one of the simplest and cheapest. It's good, but doesn't have stabilized mode. It's what I started with, except when I bought mine it was $150! See below for other options. You'll need the programming cable if you ever want to update the programming. $20 HobbyKing Multi-Rotor Control Board V3.0 (Atmega328 PA) $ 5 USBasp AVR Programming Device for ATMEL proccessors
Batteries. If you're in the US, it will probably be cheaper (counting shipping) to order separately from the US warehouse. You will probably want two to begin with. $19 Turnigy nano-tech 2200mah 3S 35~70C Lipo Pack
Props. You need two each "normal" props and two each "reverse" props. It doesn't hurt to get an extra bag of each, as they are the thing which you will break most frequently as you learn to fly.
Shipping. I'm estimating about $30-$40 or so for all of this.
Other items you will need. Once you have a battery charger and radio you are good to go on the ground side.
Battery Charger. These come in all sizes and price ranges. These are three units that I have personal experience with. $12 Turnigy 2S 3S Balance Charger. Direct 110/240v Input
At the low end... plugs into wall, works well but wil
take about 4 hours to recharge the batteries above.
12V power converter. Will charge in about 30 minutes
Transmitter/Receiver. Tons to choose from. The 9x is a nice low-price unit. It comes with a receiver; extras are about $10 each. You want a "mode 2" which means the throttle is on the left stick. These are frequently on backorder. The Internet believes there's a new model coming.
Andreas made a Hex today! He started looking at it a couple of days ago after doing some weight testing on his Quad. He's posted some notes over at diydrones. Total frame cost, about $10! He printed a cutting guide on paper and glued it to the plates for a cutting and fitting template. Here's the arms glued into the two plates.
Fitting the power distribution. Note that he's bolted the arms as well. It uses two batteries, each powering three motors in a triangular arrangement -- hopefully a power system failure will allow the three remaining motors to get the unit to the ground without a smashup.
And later that evening, it was ready to fly. This is why it's so much fun hanging around this guy!!
There's a nice RCGroups post showing that the RCTimer ESCs are easily flashable, withe the pads conveniently aligned on the edge of the unit. They use tgy.hex.
Here's a thread I started on RCGroups, verifying that ethernet cable was a good source of 24 gauge wire. It is! There are 8 wires (4 twisted pairs) in each cable. Make sure the wires are stranded and not solid, and you've got all the wiring you need, albeit in rather pastel coloration.
For me it's OK, I'm using it to make some custom receiver/APM connectors. I'll make pin 1 be the odd color on each side.
The "12" in the part number goes from 01 to 12, and indicates the number of slots. I found the best value is to buy the 12 slot units and trim them down to size. They cut easily with a box cutter.


 [Reserved for the HK link]
 random stuff the internet thinks regarding the new Turnigy Tx...
 Scott Edelman scanned this interesting graphic from a 1917 article When We All Take to the Air: Post-War Propositions for Commercial Aeronautics. Favorite prediction: “there may be a revival of smuggling.” Interesting commentary by Scott, check it out!

 APC props are sturdy and well balanced. Andreas manfully used needle-nose pliers to tighten his spinners. You can use a small screwdriver if you like.


 If you want to, you can tidy up the wiring by drilling some extra holes and running the wires through the inside of the body.
 And a document with guidelines for travelling with batteries.


.jpg)
(4).jpg)


.JPG) In his second Zii, he started with a plywood battery box. He cut this himself; it's sized to hold two 4000 mAh 3S Turnigy Nano batteries.
In his second Zii, he started with a plywood battery box. He cut this himself; it's sized to hold two 4000 mAh 3S Turnigy Nano batteries..JPG)


.jpg)


