Showing posts with label watt-meter. Show all posts

Sunday, April 8, 2012

Three Dollar Wattmeter

I've got a watt meter, but if you're wanting to measure your power system on the cheap, here's a link to the classic $3 Wattmeter based on the ubiquitous Harbor Freight digital voltmeter.

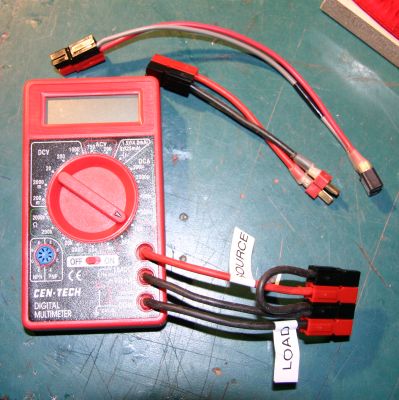
Basic Idea:  add 14 gauge wires, attach to connectors of your choice, and wire in a 1K-10K resistor to protect the circuitry when flipping through the millivolts settings.

The stock wires are good for up to 10A, and with the replacement wires it's good up to 20A.

Jackerbes has some nice construction photos. critterhuner has some here.

Here's a wiring diagram.

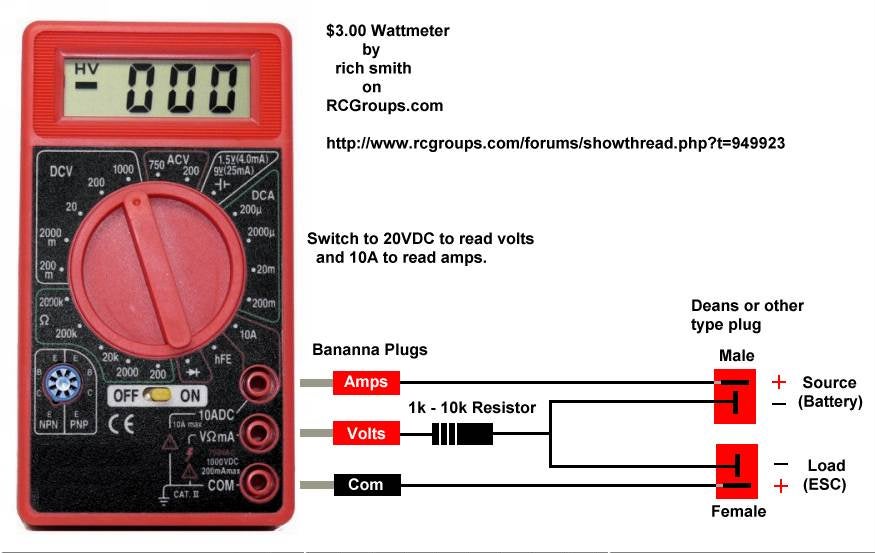
You could run two of these in series, one measuring voltage and one measuring amperage for six dollars.


And Lucien has a nice writeup on cheap power shunts that will extend the current measuring range up to 55A continuous and 100A burst.

For those interested in learning more about watt meters, check out my link above.  Here's the manual for the well known Watt's Up unit.

Wednesday, September 1, 2010

HowTo: Using a Watt Meter

Using the Hobby King X1 Watt Meter

The instructions in the package are pretty inscrutable, so here's a quick HOWTO.

Basic Idea
  • This thing sits between your battery and your ESC.
  • It measures voltage, amperage, and wattage.
  • It has a HOLD mode that keeps the highest values.
  • When it's set up, you fiddle with your props, motors, etc, and see the power requirements of various setups.
  • You can send it aloft to record the flight's peak power requirements.
 Setting Up
  • The unit doesn't come with any power connectors, so you need to attach your own.
  • The wires labeled IN attach to the battery.  Put a male power connector here.
  • The wires labeled OUT attach to the ESC.  Put a female power connector here.
  • Black wire = Neutral (-)
  • Blue wire = Hot (+)
Turning It On
  • Plug the unit into a battery.  Whatever battery you use to fly a plane is fine (the manual says the voltage rage is 8-30V, but it seems to work fine with 2S batteries as well, as seen below).
  • The display of the unit will turn on.
  • If you use a 2S battery, you will see something like this:
  • Voltage (U=7.93V).  Over time this will go down, as your battery discharges.
  • Amperage (I=0.1A)
  • Wattage (P=1.0W)
Trying It Out
  • Attach a motor to your ESC.
  • Plug your ESC into a receiver.  It's OK if there are servos attached.
  • Attach the OUT wires to your ESC.
  • Your setup should power up and work as normal.
  • The power levels should go up a bit, since you're running servos and a receiver.
  • Wiggle your servos.  You will see the numbers jiggle in response.
Testing a Motor
  • Make sure your motor is secure, and bring the speed up.
  • You will see the amperage (I=) and wattage (P=) increase.
  • Bring the speed back down.
  • You will see the values decrease back to the original values.
  • The voltage may have gone down a bit, since you've been using some power to run these tests.
HOLD mode
  • HOLD mode will measure the Peak values.
  • To turn it on, click the HOLD button.
  • Rev your motor and bring it back down a couple of times.
  • You will see these peak values displayed. Rearranging the order a bit, they are:
  • P 14.3W -- maximum power (wattage).  This is the peak power output of the battery.
  • Up 7.71V -- voltage when P was at max.
  • Ip 1.9A -- amperage when P was at max.
  • Im 1.9A -- maximum amperage, even if it didn't correspond to P above.
  • Um 7.84V -- the minimum voltage of the time period.
  • Click HOLD again to go back to instantaneous mode.
Flight Mode
  • If your plane is big enough to carry a couple of extra ounces, you can attach the meter between the battery and ESC in your plane, set HOLD mode, and find out your peak usage aloft.
Manual Calibration Mode
  • If you have a good quality multimeter, you can adjust your unit's readings.
  • Depress HOLD for three seconds and you will be in adjustment mode.
  • Measure an unloaded power source with both the watt meter and your reference multimeter.
  • Use the ADD and SUB menu items to make the two units agree.
  • SAVE will of course save your calibration.