Showing posts with label 3D Printing. Show all posts

Monday, July 28, 2014

3D Printer Checklist

Here's the 3D Printer checklist provided by Josh for our shared printer.  There's a few items specific to our site, but in general they're a good set of guidelines.  If you have your own printer you luxuriously won't have to load and unload the filament each time!

Monday, May 19, 2014

Some 3D Printed Stuff

Here's a few 3D random printed things.  First up, a side-light for the ArctiCopter.  Here's the wooden sidelights I was replacing.
I had to print in two pieces.  It's a bit floppy, but not too bad.  If I try again, I will put a T on the back for reinforcement.
Hot glue seems to work pretty nicely to bond the pieces.  I had modelled two holes so the glue would make a tight bond.  I used "high" setting on the glue gun, and it seemed to melt the two pieces together a bit.
Here's a little model I used to give the 3D printer tutorial at work.  I got it off of thingiverse and resized it down to about 10mm tall.  It came out pretty cute and printed in about 4 minutes.
I had a problem with some flat pieces curling up.  I think it was because the tape was letting go of the glass.  I tried it again with tape all the way to the edge and wrapped around, and it solved the problem.
Here's a Bixler 2 autopilot cover.  Cut out the spot just behind the cowling and it provides a nice spot to mount and cover a flight controller.

A cover for the back of the OrangeRX module.


blogodex = {"index":"3D Printing"};

Tuesday, July 9, 2013

Motor Mounts: First Try

 Here's the first run of the motor mounts I've been fiddling with on the 3D Printer. I had to drill the holes out on the drill press using a 1/8'' bit, which is 3.175mm.
 The pieces hold on to the 10mm square fiberglass arm splendidly.  The friction fit is snug.  I don't think it will take much bolt tension to hold everything together nicely.
Need to extend the width of the mounts so there is more material surrounding the hole.  As expected, the bolts don't need to be tightened up much.  Final assembly should be with nylock bolts, or using threadlock.  Tighten them in opposing pairs or you will star to pull the mounts around the stick, stretching the holding arms apart. Black looks cool, should get some black bolts too.
 Just clearing the motor shaft.  Everything spins freely.  Maybe open up the hole a bit more so the entire circular part of the motor is exposed?

Need to extend the length of the mount.  Note that the bolt holes are covered by the motor.  I think instead of a single mount that holds multiple motor sized, it will be fine to have a couple of mounts customized for different sizes.
Need to get the countersinking right.  It seems to work even with the bad countersink, but I'm a bit concerned that the motor bolts will cause some stress on the relatively thin wall of the arm and it will crack when the motor gets some stress applied to it.


To Do:

  • make a couple of parameterized files, one for each mount size. parms: motor bolt length, overall length, bolt size.
  • fix bolt holes so they don't need to be drilled out.
  • fix countersink.
  • add LED holder? (one? three across on outside?)
  • extend material around clamp bolts.

Wednesday, March 20, 2013

3D Printer Software

This post is mainly for my own convenience, listing out the software I've downloaded to do thing 3D-printerish.


  • MakerWare -- driving the MakerBot (update: ReplicatorG is better, use it)
  • ReplicatorG -- an open source alternative to MakerWare
  • SketchUp -- for drawing objects
  • OpenSCAD -- for programmatic generation of objects
  • Sketchup STL import/export -- plugin to import/export, here.  (update:If you get an error on import, it's most likely that your plugin directory is not writable.)

Thursday, February 7, 2013

MakerBot Replicator 2 Notes

Very exciting, I was able to try out the new MakerBot!  Here's some notes on getting things set up.

Note: Replicator 2 uses only PLA.

I'll come back and revise some of the missing parts (e.g. the menu instructions) after  I get a chance to go through the steps again.


Power on (switch on rear right)

Load Filament

  • snake the filament through the clear tube, from the back
  • detach clear tube from printhead
  • select menu:  utilities/filament/load (left arrow is back)
  • feed filament into head
  • you will feel the feeder take over
  • let filament go until it touches the baseplate
  • push the M button to stop filament feed
  • attach clear tube to printhead
Printing from computer
  • attach usb cable; usb cable falls between the two tables, fish out through the middle
  • run makerware, get your model ready
  • click "The Replicator 2" button
  • advanced parms:  set feed travel to 60 cm/min (default is 80) for better results
  • select raft and supports if you need them
  • see notes below on detaching
  • do something to disable sleep or you will blow your print.  on our macs, push the mouse to the bottom left corner.
  • click print.
  • when the unit starts, it will draw a line of filament from the front left corner to the start of the model.  watch for that, if this filament line is bad cancel your print.  

Printing from SD card
  • fiddle with your settings as above
  • we're still pre-7 firmware, so save as S3D
  • use an SD card of 2G or less
  • put your card in the slot
  • menu: utilities/filament/unload

To Detach
  • the baseplate will detach, push the rear tab back
  • blue painters tape can be put on the baseplate to ease detachment
  • lightly sand the tape for better adhesion, so the melted filament doesn't move around
Wrapping up
  • log piece(s) in logbook
  • unfeed filament (menu:)
  • power off
And here's my first test piece!  It's a sizer for metric nuts and bolts.  No numbers printed in this version though.  Next up:  camera carrier for Bixler 2.

Monday, December 10, 2012

APM2.5 Case on Thingiverse

Designer barneyj notes:
The mounting tabs were designed to fit on a Gaui 330x frame. I used micro servo mounting screws to screw the shell together. I made a cutout for the "ABC" status LEDs but I missed the "TX/RX" LEDs. I might incorporate it in the next iteration.
http://www.thingiverse.com/thing:36883

Friday, November 16, 2012

3D-printed Micro Quad
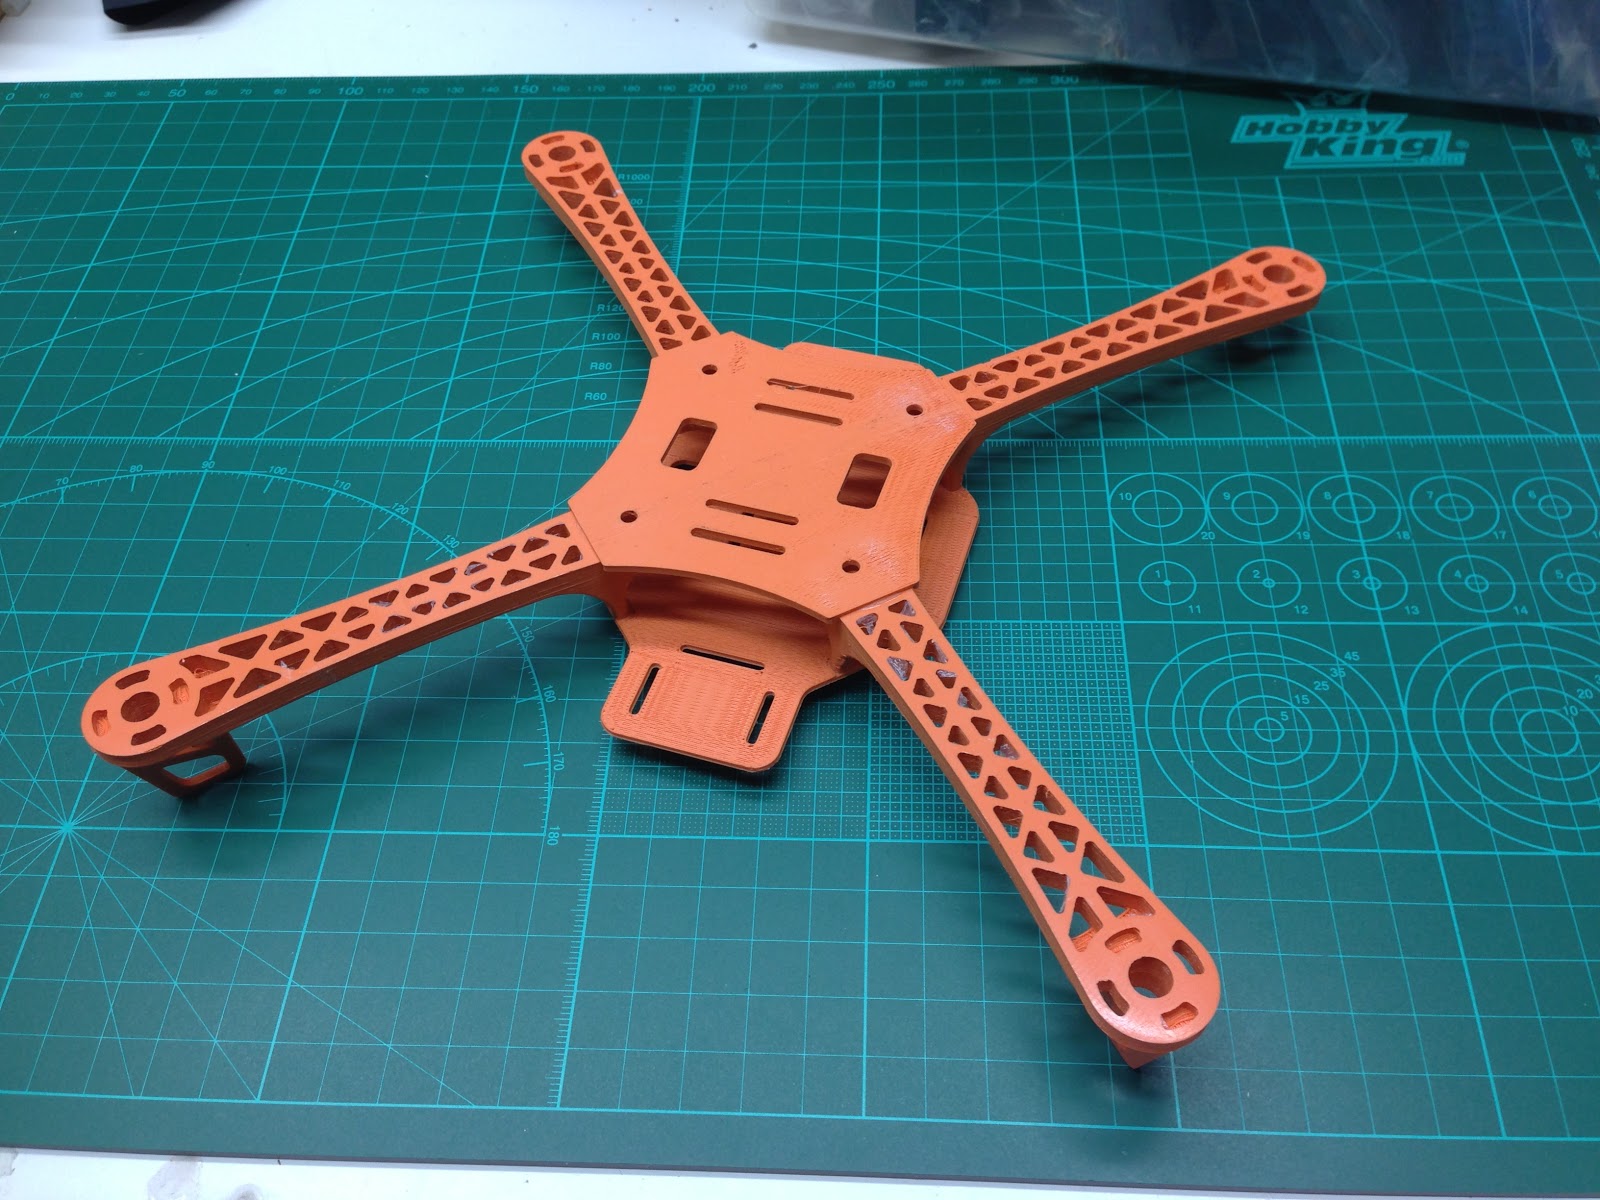
My friend who helped me out with the prop rings brought a 3D printed quad frame he had made with his high resolution 3D printer.  It seems pretty nice, and the arms are definitely sturdy enough.
There's 4 arms, a top plate, a base plate, and 4 feet.  After printing everything out you can glue them together with CA.  We had lightly glued everything together at the conference so people could see the results. Two of the feet came loose and got lost on the way back home.  I may have access to another 3D printer soon; if not, I'll just cut out a duplicate from 1/8'' ply.
You can see a bit of the striations left over as an artifact of the printing process.  I'm not sure if that could be eliminated by proper tuning or if it's a limitation of some part of the printing process.
I'm not sure of the materials cost of this piece.  It may be high enough, or the printed frame may be heavy enough that there's not a distinct advantage over buying a frame kit (for this size about 12-15 dollars) or using a material such as 3/4'' basswood.  I certainly intend to explore this further in any case!


More info on the quad design by Adam Polak here:
http://www.thingiverse.com/thing:29632
http://polakiumengineering.org/?page_id=1793
http://polakiumengineering.org/?page_id=1989

3D-printed blade guards

I recently attended a conference where one of the conferees had a makerbot and was offering to 3d-print items for people.  I was pretty excited about this -- in addition to being my first real-life experience with a 3d-printer, I had just seen the ladybird prop guards that had been uploaded to thingiverse and really wanted a set.
So, just as has been described, we downloaded the STL file and brought it into the CAD package.  We flipped the blade guard over so the arm attachment part would be on the bottom, and duplicated it so that we would print 4 in one go.  All of that would pretty straightforward.  We then fiddled with some parameters regarding plastic thickness, print speed, etc.
You can drive the makerbot directly from USB, or you can generate and download (via memory card) the "tool paths" which are in "G code" (not sure about the details here, we were going pretty quickly).  The advantage of downloading (as it was explained to me) is that you're free to use the software to continue working, and that sometimes the printer will stall waiting for data.  Here you can see the print started by laying down a lattice that will make it easy to remove the pieces from the tape.
I'm not sure why we had the pieces of tape.  I'm assuming it made it easier to pop completed items off cleanly.

Here you can see the prop guards starting to take shape.  As you can see in the video below, the unit runs quietly, and it's rather hypnotic watching it  work.
This is a couple of minutes into the printing. The entire print took about 22 minutes.  Always put your product logo in a  prominent spot!
Here's what came out, after trimming off the substrate.
But there was a problem... one of the parameters was a bit off (I didn't hear which one), so the rings printed with a hollow void between the two sides.  I think if you glued the rings together with thin CA it would be strong enough to work pretty well.
But not necessary... because we have a 3D printer!  We bumped up whatever parameter and printed a new set with fully formed rings.

The ladybird is sadly waiting for a new motherboard, but as soon as I get it I'll put the rings on and follow up as to how well it works.

But for now, I have to say my first sip of the 3D printer koolade was pretty tasty and I'm looking forward to trying some more!